前言 某天我在打算自己写一个安全agent。为了学习一下Cursor的成熟流程,想搞清楚它到底给模型发了什么东西。
结果发现 Cursor 这里藏了一个黑盒。你以为你配了自定义 API,请求应该直接走你的 endpoint,实际上它还是会按 Cursor 自己的协议组包,经过 Cursor 的服务器转发出去。也就是说,不管你怎么配,流量都要先过它一手。
那这事就有意思了。如果我能把它的请求和响应完整抓出来,就等于把这个黑盒的前端拆开了一半。
本文记录整个折腾过程。最终目标是在不中断 Cursor 正常使用的前提下,完整解密 TLS 流量,从压缩打包好的js文件还原protobuf结构,识别并解析 gRPC 和 Connect Protocol 通信,最后做一个 WebUI 用来检索和回放流量。
从 Burp 开始,然后被 CA 打脸 最开始的想法很简单。BurpSuite 或者 Yakit 这种开箱即用的 HTTPS 代理,开起来把系统代理指过去就完事了。几百年前就有的成熟方案,没什么技术含量。
打开 Burp,导出 CA 证书,双击安装到系统根证书存储。设置系统代理指向 127.0.0.1:8080。启动 Cursor。
然后 Cursor 直接报证书不信任。
这一步其实很常规,但 Cursor 这类 Electron/Node 应用有它自己的一套证书验证机制。Electron 应用的网络请求走的是 Chromium 内核,理论上应该读系统证书库,但实际情况比这复杂得多。
首先试了最基础的方案:把 Burp 的 CA 证书导入 Windows 的「受信任的根证书颁发机构」。重启 Cursor,还是不信任。
最后发现 Node.js 有个 NODE_EXTRA_CA_CERTS 环境变量,可以指定额外的 CA 证书文件路径。把 Burp 的 CA 证书导出为 PEM 格式,设置环境变量指向这个文件,重启 Cursor,终于过了。
set NODE_EXTRA_CA_CERTS=C:\path\to\burp-ca.pemexport NODE_EXTRA_CA_CERTS=/path/to/burp-ca.pem
CA 的问题解决之后,又出来一个更恶心的坑。
SSE 把 IDE 卡死了 用 Burp 抓包的时候,Cursor 的agent会一直卡住。一开始我以为是自己代理配置的问题,后来才发现问题出在 SSE 上。
Cursor 有一类 streaming 流量,Content-Type 写的是 text/event-stream,看起来像是标准的 Server-Sent Events。但实际上它根本不是在传 SSE 文本事件。
它利用了一个现实世界里的工程事实:很多中间件、代理、调试工具看到 text/event-stream 这个 Content-Type 会倾向于不缓存、不聚合、直接转发。于是 Cursor 借这个头建立了一个无缓冲的长连接,然后在这个连接里塞二进制流。
所以用 Burp 或者 Yakit 这种对流量会有加工处理的工具去抓,很容易出问题。要么代理对流做了缓冲和阻塞导致看不到实时数据,要么直接把 Cursor 的流式通道搞挂,Cursor 等不到数据界面就各种抽风。
到这里我就意识到不能再用传统拦 HTTP 的方式了。得自己写一个不阻塞的中间人。
自己写 SSL 中间人 目标很明确:代理层必须零阻塞,能稳定转发所有流量。同时要能拿到 TLS 会话密钥方便 Wireshark 解密。最好还能把流量记录下来给后面的 WebUI 用。
MITM 的核心原理 SSL/TLS 中间人的本质是「两段 TLS」。客户端以为自己在和真正的服务器握手,实际上握手对象是中间人。中间人再和真正的服务器建立另一个 TLS 连接。两边的加密是独立的,中间人能看到明文。
Cursor ←─TLS─→ MITM Proxy ←─TLS─→ api2.cursor.sh
关键在于让客户端信任中间人签发的「假证书」。这就是为什么前面要折腾 NODE_EXTRA_CA_CERTS——把我们的 CA 加到 Cursor 的信任列表里。
动态证书签发 不能提前准备好所有域名的证书,因为你不知道 Cursor 会连哪些 host。必须在运行时动态签发。
流程是这样的:客户端发起 HTTPS 请求,代理收到 CONNECT api2.cursor.sh:443 后,先不急着握手。用 Peek 偷看客户端发来的 TLS ClientHello,从里面提取 SNI(Server Name Indication)字段,这个字段告诉我们客户端想连的是哪个域名。
func extractSNI (reader *bufio.Reader) (string , error) 5 )int (header[3 ])<<8 | int (header[4 ])5 + length)return parseSNI(raw)
拿到 SNI 后,用自己的 CA 动态签发一个证书:
func (c *CA) GetCertificate (host string ) (*tls.Certificate, error) if cert, ok := c.cache.Get(host); ok {return cert, nil string {host},1 , 0 , 0 ),return cert, nil
证书缓存很重要。Cursor 会频繁建立连接,每次都现签会很慢。缓存之后同一个 host 的后续连接直接复用证书。
TLS 握手与双向转发 整个 MITM 拦截的核心代码在 internal/mitm/interceptor.go:
func (m *Interceptor) Intercept (clientConn net.Conn, host string ) error string {"http/1.1" }, "tcp" , host+":443" )string {"http/1.1" },go io.Copy(serverTLS, clientTLS) return nil
这里有一个非常刻意的选择:两端都强制 HTTP/1.1 。代码里 tls.Config 的 NextProtos 只给了 http/1.1,不支持 H2。这样可以避免 HTTP/2 多路复用和 framing 把问题复杂化。HTTP/2 的多路复用意味着一个 TCP 连接上会有多个并发的 stream,解析起来比 HTTP/1.1 的「请求-响应」模式复杂很多。为了少踩坑,直接降级到 HTTP/1.1。
KeyLog 输出 很多时候做 MITM 解析最怕的是你以为解密了,实际只解了部分或者解错了边界。KeyLog 的好处是可以让 Wireshark 独立解密同一条 TLS 流,拿到真实的明文 HTTP body 作为对照。
TLS 1.3 的 KeyLog 格式是 NSS Key Log Format,每行长这样:
CLIENT_HANDSHAKE_TRAFFIC_SECRET <ClientRandom> <Secret>
Go 的 tls.Config 支持 KeyLogWriter 字段,只要传一个 io.Writer 进去,TLS 库会自动把密钥写出来:
type KeyLog struct {func (k *KeyLog) Write (p []byte ) (int , error) defer k.mu.Unlock()return k.file.Write(p)
keylog 文件路径是 <data-dir>/sslkeys.log。在 Wireshark 里设置 Edit → Preferences → Protocols → TLS → (Pre)-Master-Secret log filename 指向这个文件,就能解密抓到的 TLS 流量。
最终的代码结构 internal/
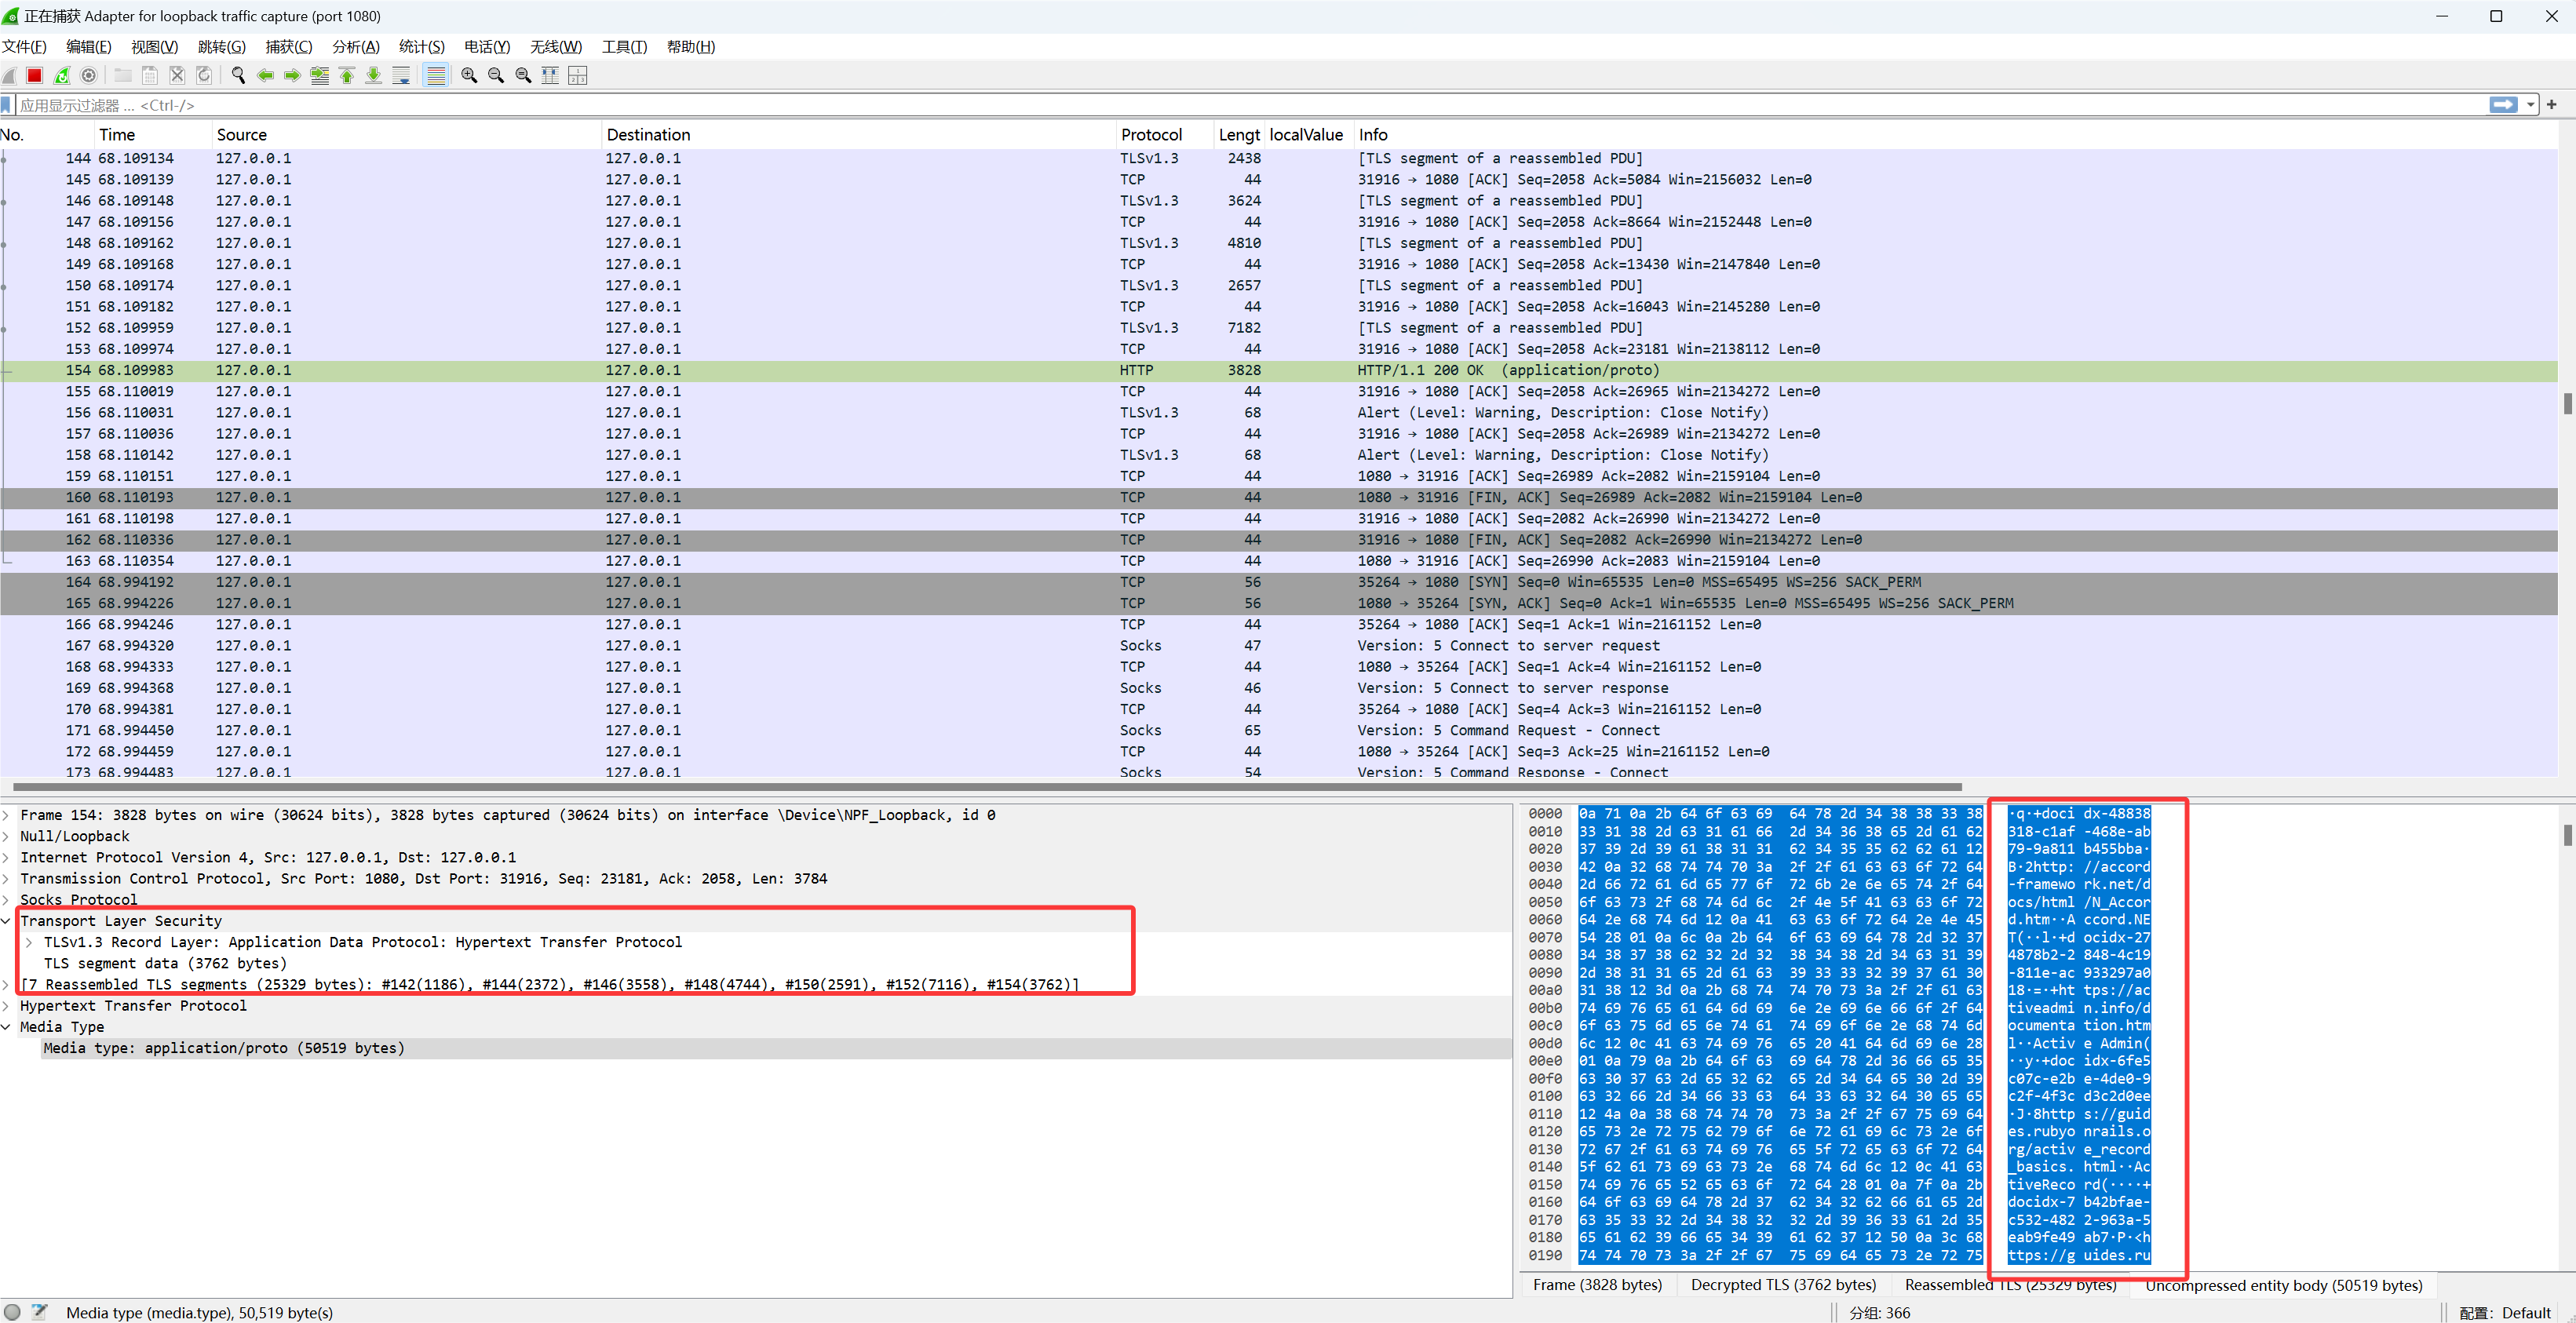
到这里能看明文 HTTP 已经不难了。但接下来发现真正有价值的东西不是普通的 HTTP JSON,而是 gRPC 和 Connect Protocol。
GRPC 的流量分析 这并不是常见的 REST 解密之后看流量,特征非常明显。请求路径长这样:/aiserver.v1.SomeService/SomeMethod。Content-Type 经常是 application/grpc、application/proto、application/connect+proto,偶尔还有 text/event-stream。
看到 application/connect+proto 这个 Content-Type,基本可以确定 Cursor 用的是 Connect Protocol 。这是 Buf 团队(就是做 protobuf 工具链那帮人)搞的一套 RPC 协议,项目地址是 connectrpc.com 。
Connect 的设计目标是兼容 gRPC 的同时更容易在浏览器和 HTTP 环境里用。它支持三种模式:
Connect Protocol :原生模式,用 application/connect+proto 或 application/connect+jsongRPC Protocol :完全兼容标准 gRPC,用 application/grpcgRPC-Web Protocol :兼容 gRPC-Web,用 application/grpc-web
Cursor 选择 Connect 是有道理的。传统 gRPC 依赖 HTTP/2 的 trailer,浏览器环境很难直接用。Connect Protocol 把这些限制绕开了,可以跑在 HTTP/1.1 上,也能很好地支持 streaming。而且 Connect 的 unary 调用就是普通的 HTTP POST,调试起来比 gRPC 友好很多。
知道了协议是什么,接下来的解析就有方向了。Connect 的 streaming 模式使用 Envelope 格式:每个消息前面有一个 5 字节的 header(1 字节 flags + 4 字节 length),和 gRPC 的 framing 一模一样。这也是为什么 Cursor 可以在 Connect 和 gRPC 之间无缝切换。
这时候我需要的不只是看见字节,而是按 framing 拆包、做 protobuf 反序列化、最好还能知道这条消息属于哪个 service 的哪个 method。
为了不影响 Cursor 的正常使用,我把解析实现做成了两条通道。主通道负责零阻塞转发,两边 io.Copy 直接走。旁路把转发时读到的字节镜像一份,异步喂给解析器。
flowchart TB
对应代码在 internal/httpstream/parser.go 的 pipeWithMirror()。用 io.TeeReader(src, pw) 一边转发一边把数据写进 io.Pipe,然后 parseStream(pr, dir) 只消费镜像数据。这样解析慢也不影响转发,只要解析器别死循环,Cursor 基本不会被卡住。
解析 gRPC 和 Connect 的关键点有两个。一个是 Content-Encoding 要先解,gzip、deflate、brotli 这些,对应 internal/httpstream/decoder.go。另一个是 Content-Type 决定 framing 方式:
Content-Type
Framing 方式
说明
application/grpc5字节头 + payload
标准 gRPC,payload 可能 gzip
application/connect+protoenvelope framing
Connect streaming
application/proto无 framing
Connect unary,直接读整段 body
text/event-stream看情况
可能是假 SSE,实际塞二进制流
gRPC 的 frame 结构长这样:
┌──────────────┬────────────────────┬─────────────────────┐
对应实现主要在 internal/httpstream/grpc.go,ParseContentType() 判断类型,HasEnvelopeFraming() 判断是否有 framing,ReadFrame() 读 5 字节头加 payload 并解压,ParseMessage() 做反序列化。
最邪门的是 gRPC-over-SSE。在代码 internal/httpstream/parser.go 的 parseResponses() 里有一段注释:
意思是请求是 gRPC 或 Connect,但响应的 Content-Type 是 text/event-stream。这时候不能按 SSE 文本事件去理解,而是继续按 gRPC framing 逐帧读二进制数据。代码里 requestWasGRPC && requestPath != "" 的时候直接走 parseGRPCStream(bodyReader, service, method, false)。
这就是我前面说的,不要把 SSE 当 SSE。它只是一个无缓冲长连接的伪装。
没有 .proto 怎么办 到这里遇到一个非常现实的问题。MITM 代理搭好了,gRPC 帧也能拆出来了,但是没有 .proto 文件,protobuf 二进制 payload 就是一坨看不懂的 bytes。
我去 Cursor IDE 的安装目录里翻了一遍,没找到 .proto 源文件。但是在搜索 typeName 关键词的时候,发现了一些有意思的东西。Cursor 用的是 bufbuild 生态的 protobuf-es 库,这个库的特点是把 proto 定义编译成 JS/TS 的 class,但会在 class 上保留完整的类型信息。
比如我在一个打包后的 JS 文件里找到这样的代码:
t.WebSearchArgs = s, s.runtime = n.proto3, s.typeName = "agent.v1.WebSearchArgs" , () => [{1 ,"search_term" ,"scalar" ,9 2 ,"tool_call_id" ,"scalar" ,9
这段代码包含了还原 .proto 所需的全部信息。typeName 是完整的类型名 agent.v1.WebSearchArgs,fields 数组里每个元素都有字段编号 no、字段名 name、类型信息 kind 和 T。T: 9 对应 protobuf 的 string 类型,其他数字对应其他标量类型。如果 T 是一个变量名而不是数字,那就是引用了另一个 message 或 enum 类型。
从 JS 还原 .proto 整个提取流程如下图:
flowchart TB
源文件是 Cursor 安装目录下的 extensionHostProcess.js,大约 28MB,一行压缩代码。直接用正则分析这种代码是不可能的,所以第一步是用 prettier 格式化,把它变成可读的多行格式。
格式化之后的代码里,protobuf message 的定义长这样:
tPe = class bd extends l constructor (e )super (), this .typeName = "agent.v1.WebSearchArgs" ,this .fields = n.proto3.util.newFieldList(() => [{1 ,"search_term" ,"scalar" ,9 2 ,"tool_call_id" ,"scalar" ,9
这里 tPe 是外部变量名,bd 是内部 class 名,agent.v1.WebSearchArgs 是完整的 protobuf 类型名。fields 数组描述了每个字段的编号、名字、类型。T: 9 表示 string 类型,其他数字对应其他标量类型:
var scalarTypes = map [int ]string {1 : "double" , 2 : "float" , 3 : "int64" ,4 : "uint64" , 5 : "int32" , 6 : "fixed64" ,7 : "fixed32" , 8 : "bool" , 9 : "string" ,12 : "bytes" , 13 : "uint32" , 15 : "sfixed32" ,16 : "sfixed64" , 17 : "sint32" , 18 : "sint64" ,
提取 message 的正则匹配过程是这样的:
stateDiagram-v2
enum 的定义格式不一样,用的是 setEnumType 函数调用:
setEnumType(SPe, "agent.v1.SubagentType" , [no : 0 , name : "SUBAGENT_TYPE_UNSPECIFIED" },no : 1 , name : "SUBAGENT_TYPE_TERMINAL_AGENT" },no : 2 , name : "SUBAGENT_TYPE_WEB_AGENT" },
service 的定义是对象字面量:
nTe = {"aiserver.v1.AiService" ,name : "StreamChat" , I : eTe, O : tTe, kind : w.ServerStreaming },name : "RunSSE" , I : rTe, O : iTe, kind : w.ServerStreaming },
这里 I 和 O 是输入输出类型的变量名,要查映射表才能知道真实类型。kind 指定是 Unary、ServerStreaming、ClientStreaming 还是 BiDiStreaming。
关键的数据结构是 varToType 映射表,它建立了 JS 变量名到 protobuf 类型名的对应关系:
varToType := make (map [string ]string )for _, msg := range messages {if msg.VarName != "" {if msg.InternalName != "" {
因为字段定义里引用其他类型时用的是变量名(T: SPe)或内部类名(T: bd),没有这个映射表就无法还原出正确的类型引用。
字段解析要处理各种 protobuf 特性。parseFieldObject 函数从字段对象里提取信息,针对不同情况有不同的处理逻辑:
flowchart TB
实际代码里,T 的值有三种形式要处理。如果是数字就直接查标量类型表。如果是变量名就查 varToType 映射。如果是 getEnumType(SPe) 这种调用,要先用正则提取出里面的变量名再查映射:
`T:\s*\w+\.getEnumType\s*\(\s*([\w$]+)\s*\)` )if enumMatch := enumTypeRe.FindStringSubmatch(obj); enumMatch != nil {1 ] else {`T:\s*([\w$]+)` )if tMatch := tRe.FindStringSubmatch(obj); tMatch != nil {if t, err := strconv.Atoi(tMatch[1 ]); err == nil {else {1 ]
循环导入的处理 生成 .proto 文件的时候遇到一个棘手的问题。Cursor 的 proto 定义分散在多个 package 里,比如 aiserver.v1、agent.v1、anyrun.v1 等。这些 package 之间互相引用,如果按标准的 import 方式生成,很容易出现循环导入。
比如 aiserver.v1 里的某个 message 引用了 agent.v1.SomeType,而 agent.v1 里又引用了 aiserver.v1.AnotherType。标准做法是在 aiserver_v1.proto 里写 import "agent_v1.proto",然后在 agent_v1.proto 里写 import "aiserver_v1.proto"。但这样 protoc 编译的时候就会报循环导入错误。
解决办法是放弃跨包 import,改成直接把被引用的类型复制到当前包里。整个复制过程是递归的:
flowchart TB
copyAllExternalTypes 函数实现了这个递归复制逻辑。每一轮扫描当前 package 里所有 message 的字段,收集引用的外部类型,然后把这些类型复制进来。复制进来的类型又会引用更多外部类型,所以要继续下一轮扫描,直到没有新类型需要复制为止:
for round := 1 ; ; round++ {make (map [string ]bool )for _, msg := range result.messages {for _, f := range msg.Fields {0 for typeName := range neededTypes {if refPkg == pkgName || isGooglePkg(refPkg) || localTypes[shortName] {continue if msg, ok := allMessages[typeName]; ok {append (result.messages, msgCopy)true if copiedThisRound == 0 {break
唯一保留的 import 是 Google 官方的标准类型。collectImports 函数只收集 google.protobuf.* 和 google.rpc.* 的引用,其他全部通过复制解决:
func collectImports (...) map [string ]bool make (map [string ]bool )func (varName string ) if typeName, exists := varToType[varName]; exists {if refPkg == "google.protobuf" {switch shortName {case "Struct" , "Value" , "ListValue" :"google/protobuf/struct.proto" ] = true case "Timestamp" :"google/protobuf/timestamp.proto" ] = true
生成的 proto 文件里,复制进来的类型会加注释标明来源:
// Copied from: agent.v1.ToolCall (var: tPe, class: bd)
这样做的代价是生成的 proto 文件会比较大,同一个类型可能在多个文件里重复出现。但对于逆向分析来说这完全可以接受,我只需要能正确反序列化就行了,不需要这些 proto 文件有多优雅。
类型自动匹配 proto 文件生成好、编译成 Go 代码之后,下一步是让 MITM 代理能自动匹配类型。拦截到一个请求 POST /aiserver.v1.RepositoryService/SyncMerkleSubtreeV2,代理需要知道请求体应该用什么 message 类型反序列化,响应体又是什么类型。
Go 的 protobuf 库有一个全局注册表机制。编译生成的 pb 包在被 import 的时候会自动把自己的所有类型注册到 protoregistry.GlobalFiles 和 protoregistry.GlobalTypes 里。在代理代码里用匿名 import 触发这个注册过程:
import ("github.com/burpheart/cursor-tap/cursor_proto/gen/agent/v1" "github.com/burpheart/cursor-tap/cursor_proto/gen/aiserver/v1" "github.com/burpheart/cursor-tap/cursor_proto/gen/anyrun/v1" "github.com/burpheart/cursor-tap/cursor_proto/gen/internapi/v1"
类型查找使用两级策略:
flowchart TB
策略 1 是最准确的方式。用 protoregistry.GlobalFiles.FindDescriptorByName(service) 找到 ServiceDescriptor,然后用 serviceDesc.Methods().ByName(method) 找到 MethodDescriptor,最后从 methodDesc.Input() 和 methodDesc.Output() 拿到精确的类型:
func (r *MessageRegistry) tryFromServiceDescriptor (service, method string ) bool if err != nil {return false if !ok {return false if methodDesc == nil {return false if mt, err := protoregistry.GlobalTypes.FindMessageByName(inputType.FullName()); err == nil {if mt, err := protoregistry.GlobalTypes.FindMessageByName(outputType.FullName()); err == nil {return true
策略 2 是 fallback,用命名约定猜测。大多数 gRPC service 的 request 和 response 类型名都遵循固定模式:
func (r *MessageRegistry) tryFromNamingConventions (service, method string ) bool "." )] struct { reqSuffix, respSuffix string }{"Request" , "Response" }, "Req" , "Resp" }, "" , "Response" }, for _, p := range patterns {"." + method + p.reqSuffix"." + method + p.respSuffix
有了类型信息,反序列化就很直接了。ParseMessage 函数根据是请求还是响应选择对应的类型,然后调用 proto.Unmarshal:
func (p *GRPCParser) ParseMessage (frame *GRPCFrame, service, method string , isRequest bool ) *GRPCMessage var msgType protoreflect.MessageTypeif isRequest {else {string (jsonBytes)return msg
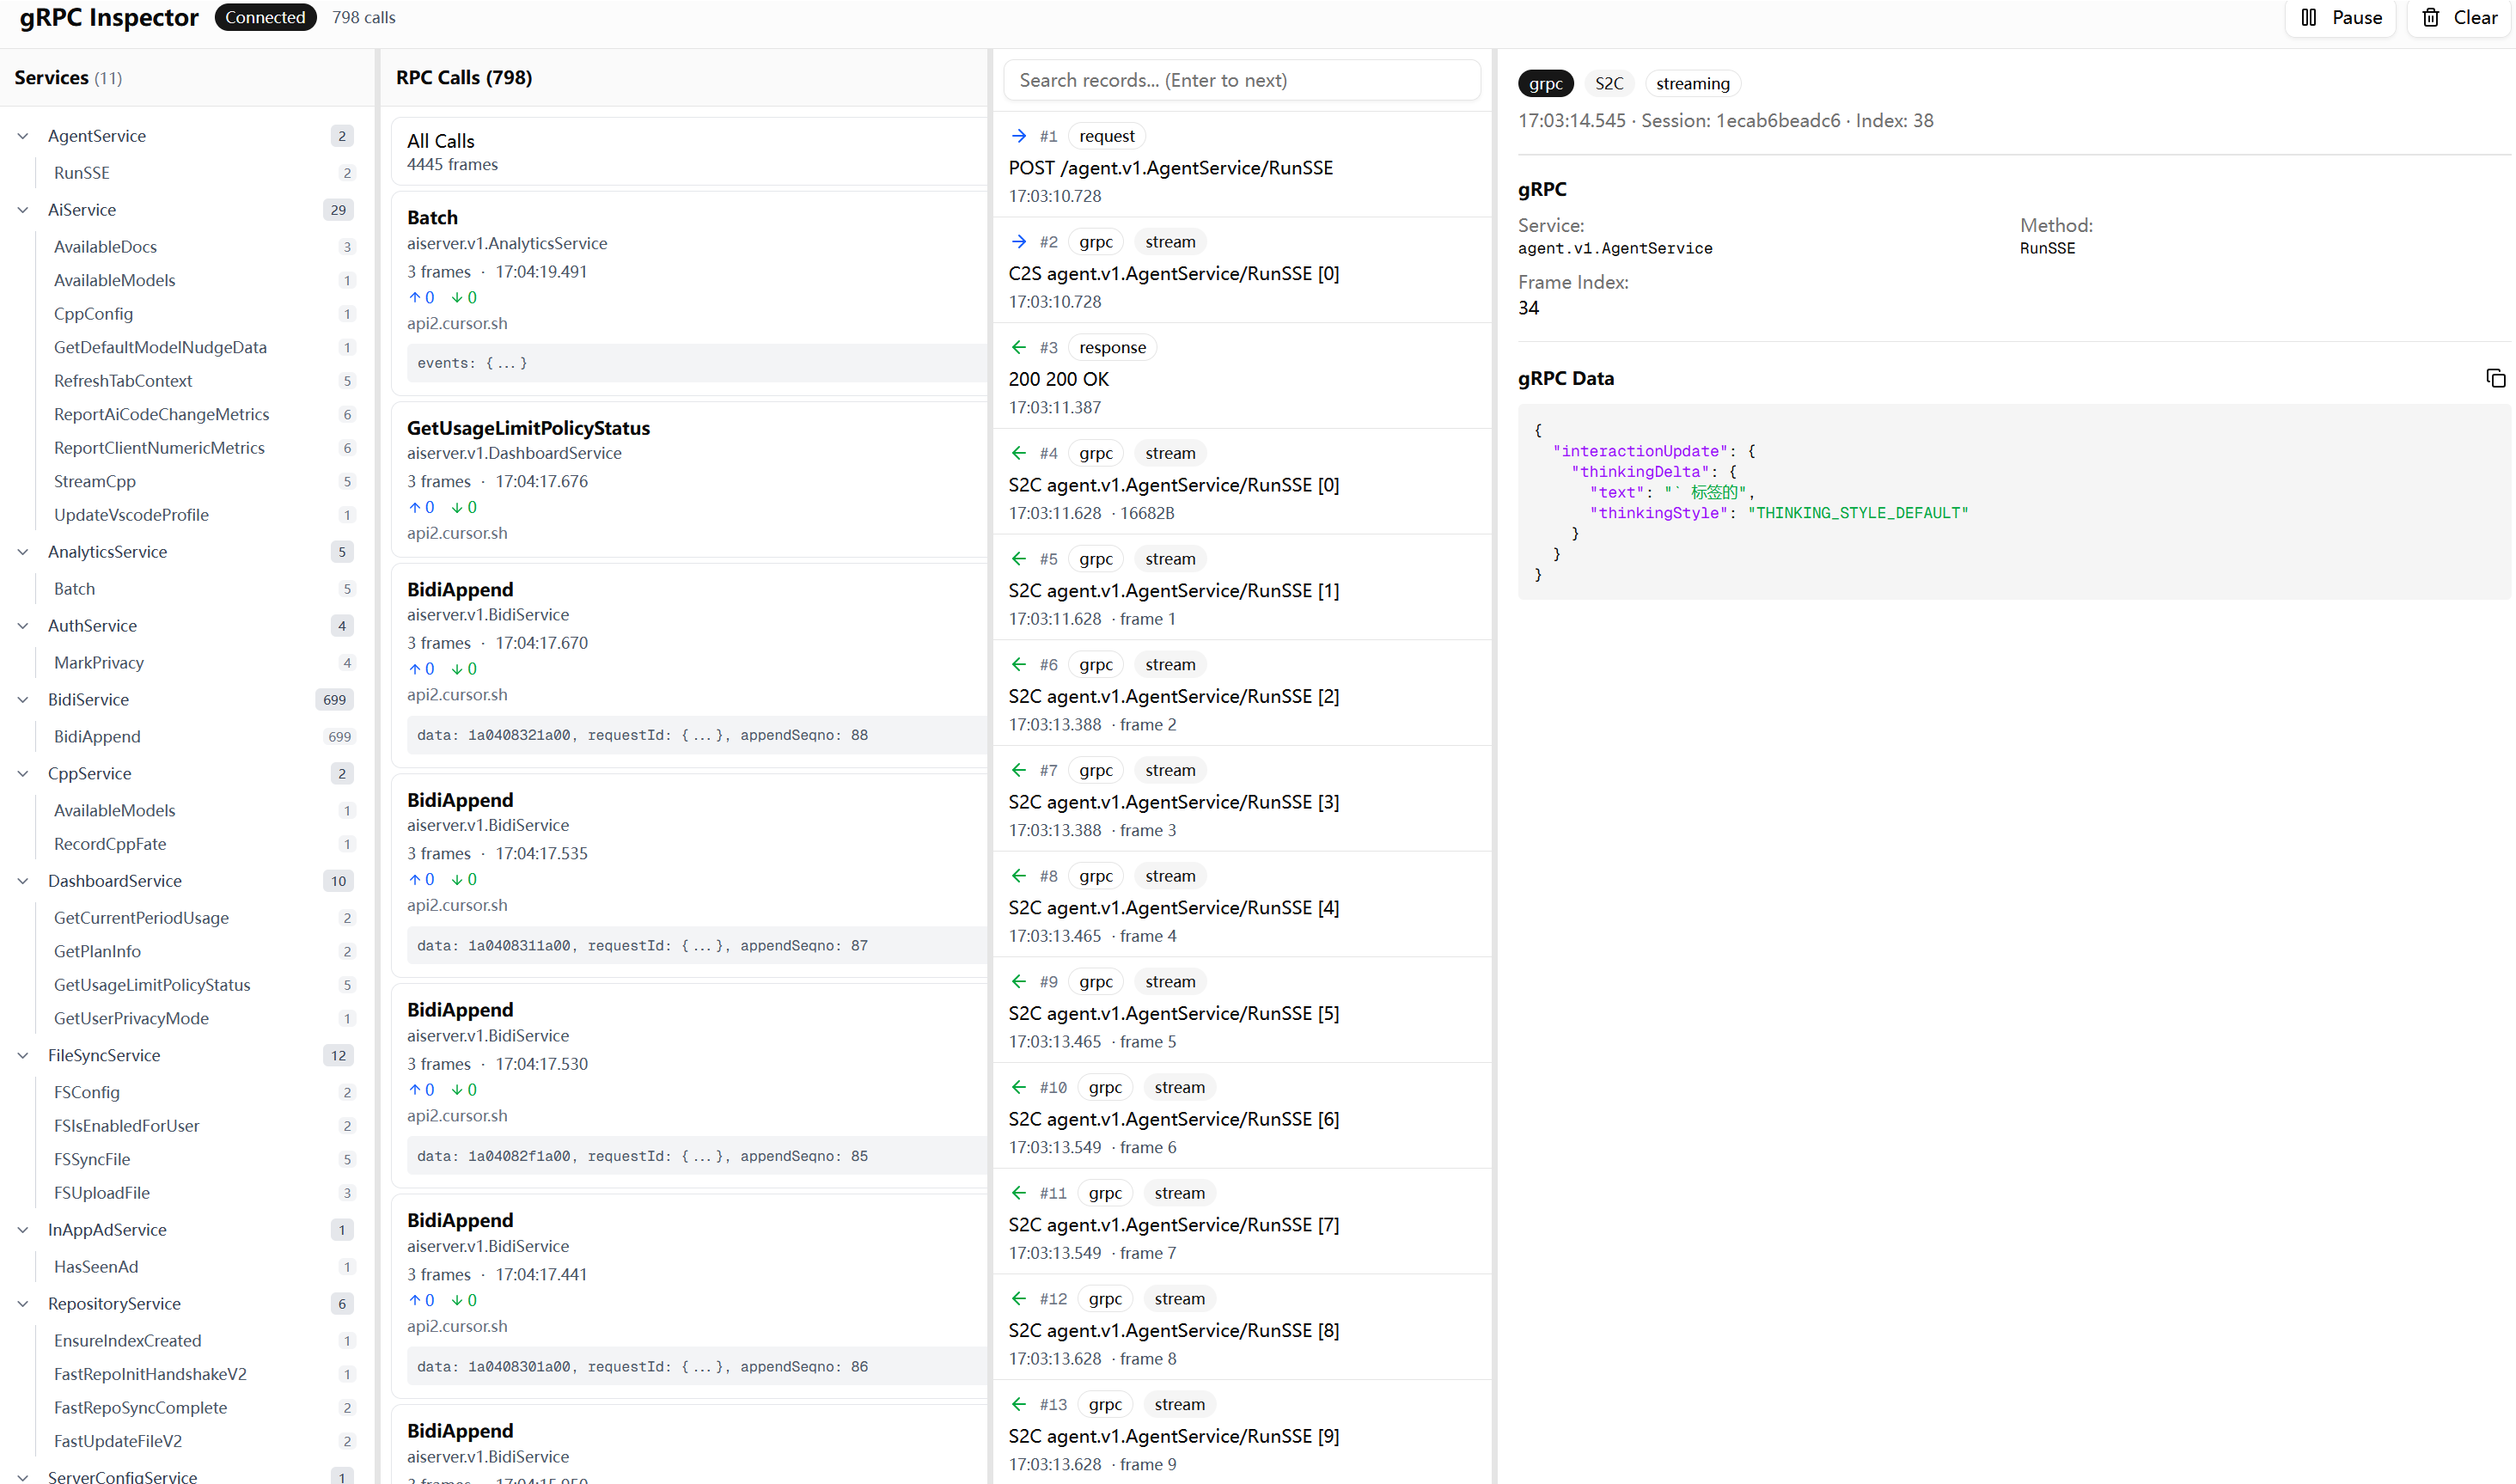
WebUI 如果只是把解析结果打印在控制台或者写到 JSONL 文件,看久了会疯。Cursor 的请求量太大,大量请求是同一个 service 的不同 method,还夹带 streaming。
为什么不用 Burp / Yakit 常见的抓包工具比如 Burp、Yakit、Fiddler,基本都是两栏布局:左边请求列表,右边请求详情。这种设计是给 REST API 用的,REST 的组织单位是路由(URL path),本质上是扁平的字符串列表,一栏足够。
gRPC 不一样,它的组织单位是服务方法,天然是树形结构:Package → Service → Method。Cursor 的流量里有 AiService.RunSSE、AiService.StreamCpp、CppService.CppConfig、BidiService.BidiAppend 这些,如果像 REST 一样平铺成 URL 列表,看起来就是一堆 /aiserver.v1.AiService/RunSSE,很难快速定位到某个服务的所有方法。
另一个问题是 streaming。一次 RunSSE 调用会产生几十到几百个帧,每帧都是独立的 protobuf 消息。Burp 要么把整个 stream 显示成一坨二进制,要么只显示 HTTP 层的请求响应头,看不到里面的帧结构。gRPC 的 body 是二进制 protobuf,Burp 能显示 hex 但没法自动反序列化。
四栏布局 所以我做了一个专门针对 gRPC 的 WebUI,用四栏布局:
┌─────────────┬─────────────┬─────────────┬─────────────────────────┐
第一栏是服务树,把 gRPC 的 Service → Method 层级展示出来,点击可以过滤。这一栏是 REST 工具没有的,因为 REST 没有这种强树形结构。第二栏是 RPC 调用列表,每个调用显示 method 名、时间、上下行字节数。第三栏是帧列表,streaming 调用展开后能看到每一帧,C2S 和 S2C 用颜色区分。第四栏是详情,反序列化后的 JSON。
四个面板之间有可拖动的分隔条,宽度可以自由调整。
实时推送 传统抓包工具大多是请求完成后才显示,或者需要手动刷新。但 Cursor 的 AI 对话是 streaming 的,如果等整个流结束再显示,可能要等几十秒甚至几分钟。
WebUI 用 WebSocket 做实时推送。代理每解析出一帧就立刻推给前端,前端收到就追加到列表里。这样可以实时看到 AI 的思考过程、工具调用、文本生成,不用等整个对话结束。
代码结构 对应的代码结构是 internal/httpstream/recorder.go 负责记录,internal/api/handlers.go 提供 /ws/records 的 WebSocket 实时推送和 /api/records 的首屏拉取,web/ 目录是 Next.js 前端。
记录格式里专门为 gRPC 留了字段:grpc_service、grpc_method、grpc_streaming、grpc_frame_index、grpc_data 存 protojson 的 JSON,失败时保留 grpc_raw 的 base64 用于 debug。
流量分析 有了能反序列化的 WebUI 之后,终于可以认真看看 Cursor 到底在干什么了。我挂着代理用了一段时间,攒了大约 8 万条请求记录,然后写脚本做了一些统计分析。
服务调用分布 按调用频率排序,最活跃的几个服务是:
5708 BidiService/BidiAppend (写通道,低频短连接)
绝大部分请求(90%以上)使用 Connection: close 短连接,每个请求独立建立 TCP 连接。只有少量请求使用 keep-alive 复用连接。
双通道通信模型 flowchart LR
AI 对话采用了读写分离的双通道设计。AgentService/RunSSE 是读通道,虽然只有 40 次调用,但每次调用是一个持续数分钟的长连接,单个 session 最多传输了 4838 帧数据,承载模型返回的大量 token。BidiService/BidiAppend 是写通道,调用 5708 次,每次都是独立的短连接,平均间隔 3.5 秒,负责发送用户消息和工具执行结果。
flowchart TB
这是一个典型的读写分离 设计。模型对话在大部分场景下是读多写少的:用户发一句话,模型可能返回几千个 token 的响应。RunSSE 用长连接负责读(接收 AI 响应流),客户端发过去的只是一个 requestId,然后持续接收流式输出。BidiAppend 用短连接负责写(发送用户消息、工具调用结果、文件内容等),每条消息带序列号确保顺序。长连接承载高频的读操作,短连接处理低频的写操作,各司其职。
AgentService/RunSSE 的 streaming 数据里,服务端返回的消息类型非常丰富:
消息类型统计 (S2C 方向):
InteractionUpdate 完整类型 根据 proto 定义,InteractionUpdate 的 oneof 包含以下类型(注意字段编号不是连续的):
message InteractionUpdate oneof message {1 ; 2 ;3 ; 4 ; 5 ; 6 ; 7 ; 8 ; 9 ; 10 ; 11 ; 12 ; 13 ; 14 ; 15 ; 16 ; 17 ;
字段编号跳跃(1-8, 9-14, 15-17)说明协议经历过多次迭代,中间可能删除或重新编号过字段。
userMessageAppended 是服务端对客户端发送的用户消息的确认回显,可用于验证消息已被接收。
一次典型的 AI 对话流程是这样的:客户端发送 requestId 开始对话,服务端先返回 thinkingDelta 流式输出思考过程,然后 thinkingCompleted 表示思考结束。接着如果需要调用工具,会依次返回 partialToolCall(工具名称)→ toolCallStarted(完整参数)→ toolCallDelta(工具执行的增量输出,比如正在写的代码)→ toolCallCompleted。如果是纯文本回复,则直接返回 textDelta。整个过程中穿插 tokenDelta 计数和 heartbeat 保活。
代码补全走的是另一个服务 AiService/StreamCpp,消息结构更简单:
"modelInfo" : {"isFusedCursorPredictionModel" : true , "isMultidiffModel" : true }}"rangeToReplace" : {"startLineNumber" : 14 , "endLineNumberInclusive" : 14 }}"text" : "\n\tGetRecentRecords(limit int) []Record" }"doneEdit" : true }
Cursor 启动后的通信时间线大概是这样:
[启动阶段 0-10s]
可以看到 Cursor 在启动时会完成一系列初始化,然后持续进行健康检查和指标上报。当用户触发 AI 对话时,读写分离的双通道同时启动:RunSSE 长连接持续接收模型输出,BidiAppend 短连接按需发送用户输入。
代码仓库云索引同步 Cursor 的 AI 功能依赖云端的代码索引。RepositoryService 负责将本地代码仓库同步到云端,支持语义搜索和上下文理解。
sequenceDiagram
Merkle 树增量同步 Cursor 使用 Merkle 树来实现增量同步。每个目录和文件都有一个哈希值(hashOfNode),父节点的哈希由所有子节点计算得出。
"repository" : {"repoName" : "e2ebbc72-b863-4378-acd0-77a9e6edf72b" ,"repoOwner" : "google-oauth2|user_01JKFJ1EG63ZJMQA9Q5ZA7J72Q" ,"isLocal" : true ,"numFiles" : 52 ,"orthogonalTransformSeed" : 1375170698312382 "rootHash" : "18ee31840cb4b50ebd28d77fbb47ad6f3dce23915bbe8f626bf438a1b8deff8e" ,"similarityMetricType" : "SIMILARITY_METRIC_TYPE_SIMHASH" ,"similarityMetric" : [-0.269 , 0.077 , 0 , 0.038 , ...]
客户端发送 rootHash,服务端对比云端存储的哈希。如果不同,返回 STATUS_OUT_OF_SYNC,然后开始 Merkle 树的逐层对比。
"mismatch" : {"children" : ["relativeWorkspacePath" : ".\\internal" , "hashOfNode" : "677b8572..." },"relativeWorkspacePath" : ".\\cmd" , "hashOfNode" : "59acd620..." },"relativeWorkspacePath" : ".\\test.jsonl" , "hashOfNode" : "6a7df516..." }
客户端收到不匹配列表后,对每个子节点递归调用 SyncMerkleSubtreeV2,直到找到具体变更的文件。这种方式只传输变更的部分,而不是整个仓库。
文件增删改同步 FastUpdateFileV2 支持完整的文件增删改操作:
enum UpdateType 0 ;1 ; 2 ; 3 ; 4 ;
新增文件 :
{"updateType" : "UPDATE_TYPE_ADD" ,"localFile" : {"file" : {"relativeWorkspacePath" : ".\\internal\\httpstream\\recorder.go" ,"contents" : "package httpstream\n\nimport (\n..." "hash" : "abc123..."
删除文件 :
{"updateType" : "UPDATE_TYPE_DELETE" ,"localFile" : {"file" : {"relativeWorkspacePath" : ".\\old_file.go" }
修改文件 :
{"updateType" : "UPDATE_TYPE_MODIFY" ,"localFile" : {"file" : {"relativeWorkspacePath" : ".\\main.go" ,"contents" : "// 修改后的内容..." "hash" : "new_hash..."
批量操作 (V2 版本):
{"updateType" : "UPDATE_TYPE_BATCH" ,"fileUpdates" : [
路径加密 注意 relativeWorkspacePath 使用了加密路径(如 .\\QEsaENnW4i_0qQ.OXKHq1uwBDoO3Gdfra8),而 unencrypted_relative_workspace_path 保存原始路径。服务端配置中有 defaultUserPathEncryptionKey 字段用于路径加密,但具体加密算法未知。
文件内容与隐私 文件内容以明文传输(HTTPS 加密)。即使在隐私模式下,不在排除列表的所有文件(包括二进制文件)仍会完整同步到云端。
通过邮件询问 Cursor 安全团队,得到的答复是:这个 RPC 端点确实用于代码库索引,但原始代码只临时存储在内存中,仅用于生成 AI 向量嵌入,不会持久化存储。
This endpoint is used for codebase indexing: https://cursor.com/docs/context/semantic-search
索引配置 服务端通过 GetServerConfig 返回索引相关配置:
{"indexingConfig" : {"maxConcurrentUploads" : 64 ,"absoluteMaxNumberFiles" : 100000 ,"maxFileRetries" : 30 ,"syncConcurrency" : 20 ,"autoIndexingMaxNumFiles" : 50000 ,"indexingPeriodSeconds" : 277 ,"incremental" : true ,"multiRootIndexingEnabled" : true ,"maxBatchBytes" : 2097152 ,"maxBatchNumRequests" : 20 ,"maxSyncMerkleBatchSize" : 50
这说明 Cursor 限制单个仓库最多 100000 个文件,自动索引限制 50000 个文件,每次批量同步最多 50 个 Merkle 节点。超大型仓库可能无法完全索引。
与 AI 对话的关系 代码索引的目的是支持 AI 的语义搜索。当模型需要搜索代码时,服务端可以通过 RepositoryService.SearchRepositoryV2 或 SemSearchFast 在云端索引中查找相关代码,而不需要从客户端实时读取。
这与 KV 存储的设计不同:KV 存储是对话上下文的缓存(服务端只存索引,数据在客户端),而代码索引是真正存储在云端的(服务端存储完整内容,用于 AI 检索)。
RunSSE 通信格式分析 AgentService/RunSSE 是 AI 对话的核心读通道,采用 Connect Protocol 的 streaming 模式。理解它的通信格式是分析 Cursor AI 交互的基础。
请求格式 RunSSE 的请求非常简单,只发送一个 requestId:
{"requestId" : "b600b543-4991-4b4e-9fbf-c9f3865d4a8c" }
这个 requestId 是客户端生成的 UUID,用于关联后续的 BidiAppend 消息。真正的对话内容(用户消息、上下文、工具结果)全部通过 BidiAppend 写通道发送,RunSSE 只负责建立长连接并持续接收服务端推送。
响应格式 RunSSE 响应是一个持续的 gRPC streaming,使用 Connect Protocol 的 Envelope 格式。每一帧都是一个独立的 protobuf 消息,前面有 5 字节的 header(1 字节 flags + 4 字节 length)。
响应流按时间顺序包含多种消息类型:
前几帧 - KV 存储指令 :服务端首先通过 kvServerMessage.setBlobArgs 下发 system prompt 和上下文信息,要求客户端缓存。
"kvServerMessage" : {"id" : 1 ,"spanContext" : {"traceId" : "792e88790c0eb27323f94aad1b3d7669" , "spanId" : "afb30018f693935e" },"setBlobArgs" : {"blobId" : "BmMGyicTrLKMTPsWSOJK3yW9v+IZEbz5fWPE9RC5mNc=" ,"blobData" : "eyJyb2xlIjoic3lzdGVtIiwiY29udGVudCI6..."
中间帧 - AI 输出流 :模型开始输出后,每个 token 或思考片段都是一个独立的帧。
"interactionUpdate" : {"thinkingDelta" : {"text" : "用户展" , "thinkingStyle" : "THINKING_STYLE_DEFAULT" }}}"interactionUpdate" : {"tokenDelta" : {"tokens" : 1 }}}"interactionUpdate" : {"thinkingDelta" : {"text" : "示了 " , "thinkingStyle" : "THINKING_STYLE_DEFAULT" }}}"interactionUpdate" : {"textDelta" : {"text" : "我来帮你" }}}"interactionUpdate" : {"tokenDelta" : {"tokens" : 1 }}}
工具调用帧 :当 AI 需要执行工具时,会发送工具调用请求。
{"interactionUpdate" : {"toolCallDelta" : {"toolCallId" : "call_xxx" , "name" : "read_file" , "arguments" : "{\"path\": \"/src/main.go\"}" }}}
结束帧 :对话结束时发送完成标记。
{"interactionUpdate": {"finished": {"conversationState": {...}}}}
Streaming 特性 RunSSE 使用 Content-Type: text/event-stream,但这只是为了让连接保持无缓冲的长连接状态,实际内容不是标准的 SSE 文本事件格式。真实的 payload 是 Connect Protocol 的 Envelope 帧,需要按 5 字节 header + protobuf body 的格式解析。
单个 RunSSE 连接可以持续数分钟,传输数千帧数据。从流量统计看,最活跃的会话单次连接传输了 4838 帧,承载了模型输出的大量 token、工具调用、KV 同步等全部内容。
System Prompt System prompt 在 RunSSE 响应流的最开始通过 kvServerMessage.setBlobArgs 传输。当客户端发起 AgentService/RunSSE 请求后,服务端返回的前几帧都是 KV SetBlob,用于下发 system prompt 和上下文信息。客户端收到后,通过 BidiAppend 通道 发送 kvClientMessage.setBlobResult: {} 确认存储成功。KV 的请求和响应走的是不同通道。
从成功解析的会话(session: 68012f5fa829)可以看到这个结构:
"kvServerMessage" : {"setBlobArgs" : {"blobId" : "Bxxxxxxxc=" ,"blobData" : "eyJyb2xlIjoic3lzdGVtIiwiY29udGVudCI6IllvdS..." "kvServerMessage" : {"id" : 1 ,"setBlobArgs" : {"blobId" : "Bxxxxxxxc=" ,"blobData" : "eyJyb2xlIjoidXNlciIsImNvbnRlbnQiOiI8dXNlcl9pbmZvPi..." "interactionUpdate" : {"thinkingDelta" : {"text" : "用户发送了..." }
解码第一帧的 blobData(base64 → JSON),得到完整的 {"role":"system","content":"XXX"} 格式的 system prompt(18305 bytes)
它采用类似 XML 标签来分段组织
下面是原始提示词开头部分
You are an AI coding assistant, powered by Claude Opus 4.5.
提示词里有非常详细的工具使用规则。比如不要在对话中提及工具名称,要用自然语言描述。优先使用专用工具而不是 shell 命令。独立的工具调用要并行执行。编辑前必须先读取文件。不要生成超长 hash 或二进制内容。这些规则确保模型的输出对用户友好,同时避免产生无意义的大块数据。
但 system prompt 本身不在 BidiAppend 流量中传输。客户端发送的是结构化的 JSON 数据,服务端在调用模型之前才会把这些内容组装成完整的 prompt。要理解这个过程,需要先看 BidiAppend 请求的具体结构。
BidiAppend 数据格式 抓到的 BidiAppendRequest 解析出来长这样:
{"data" : "0abfac050ae8340a04...(很长的hex字符串)" ,"requestId" : {"requestId" : "b600b543-4991-4b4e-9fbf-c9f3865d4a8c" },"appendSeqno" : "5"
data 字段是一串十六进制字符。直接 hex decode 之后是二进制,不是可读文本。尝试按 protobuf wire format 解析,能看出是嵌套的 length-delimited 结构,但不知道具体是什么类型。
去 JS 源码里搜 appendSeqno,在 cursor-always-local/dist/main.js 里找到了:
this .bidiClient.bidiAppend({BigInt (p),"hex" )headers : s})
data 的编码方式确认了:.toBinary() → Buffer.from() → .toString("hex")。但 m.value 是什么类型?
往上翻这个函数,找到 m 的来源:
async *yieldingInputsToTheServer (e, t, n, i )for (;;) {const m = await Promise .race([c.next(), ]);if (m.done) break ;
m 来自迭代器 c,继续往上找 c 是什么:
const c = t[Symbol .asyncIterator]();
t 是函数的第二个参数。再搜这个函数在哪被调用:
async *run (e, t )yield * this .yieldingInputsToTheServer(r, e, o, s);
e 是 run() 的第一个参数,是输入的迭代器。再往上找谁调用了 BidiTransport.run():
const client = createClient(AgentService, transport);
查 AgentService 的定义,run 方法的输入类型是 AgentClientMessage:
{"agent.v1.AgentService" ,
所以 m.value 和RunSSE的首包一样 就是 AgentClientMessage 实例。现在可以用正确的 proto 定义解析了:
hex decode 后的前几个字节:
继续往下剥,能看到嵌套的 UserMessageAction,再往下是 UserMessage.content,里面存的是 JSON 字符串。
数据结构 message BidiAppendRequest string data = 1 ; 2 ;int64 append_seqno = 3 ;message AgentClientMessage oneof message {1 ; 2 ; 3 ; 4 ; 5 ; 6 ; 7 ; 8 ;
data hex decode 后的首字节决定消息类型(protobuf wire format: field_number << 3 | wire_type)。0x0a 对应 field 1 的 run_request,用于初始对话请求,包含用户消息和上下文。0x12 对应 field 2 的 exec_client_message,返回工具执行结果。0x1a 对应 field 3 的 kv_client_message,是 KV 存储响应。0x22 对应 field 4 的 conversation_action,用于后续用户消息等对话动作。0x2a 对应 field 5 的 exec_client_control_message,处理流控制如 streamClose。0x3a 对应 field 7 的 client_heartbeat,是心跳消息。
消息角色分布如下:
user: 81 messages - 用户输入和上下文摘要
有个有趣的细节:大部分 user 消息的 content 字段是数组格式(75个),只有少数是纯文本(2个以 XML 标签开头)。这说明 Cursor 使用的是 Claude 的多模态消息格式,可以混合文本、图片等内容。
用户消息结构:
{"role" : "user" ,"content" : "[Previous conversation summary]: Summary:\n1. Primary Request..." ,"providerOptions" : {"cursor" : {"requestId" : "fa28dbe5-9575-4fe6-b84e-8909f42d212c"
providerOptions.cursor.requestId 用于关联这条消息属于哪个对话请求。同一个对话里的所有消息共享相同的 requestId,这样服务端可以把它们组织成一个完整的上下文。
工具结果消息结构:
{"role" : "tool" ,"id" : "toolu_01UUU6EL3v4epm35CYNytYWC" ,"content" : ["type" : "tool-result" ,"toolName" : "Read" ,"toolCallId" : "toolu_01UUU6EL3v4epm35CYNytYWC" ,"result" : " 1|'use client';\n 2|..." ,"experimental_content" : [...]
result 字段里的文件内容是带行号的,格式 行号|内容,方便模型引用具体行。这个格式在 Cursor 的代码引用功能中很重要,模型可以精确地说”第 42 行有问题”,而用户能立即定位。
除了常规的对话消息,BidiAppend 还有几种特殊消息:
心跳消息 :clientHeartbeat 只有 2 字节(hex: 3a00),对应 field 7 + length 0,内容为空 {}。用于保持连接活跃,防止代理或防火墙因为空闲超时而断开连接。
初始化 ping :会话开始时发送 5 字节的 0a03666f6f(解码为 field 1 + 字符串 “foo”),这不是标准的 AgentClientMessage 格式,proto 解析会失败。可能是客户端用于测试连接的特殊握手消息。如果在解析 BidiAppend 数据时遇到 unmarshal 错误,很可能就是碰到了这类非标准消息。
理解了消息格式之后,接下来看看 Cursor 的工具系统是怎么运作的。
工具调用详解 sequenceDiagram
统计了所有工具调用类型的分布:
editToolCall: 441 (代码编辑)
每种工具的参数结构都不同。以下是各工具的完整参数:
editToolCall - 代码编辑:
{"args" : {"path" : "d:\\cursor-tap\\internal\\httpstream\\recorder.go" ,"streamContent" : "// 要写入的代码内容..."
readToolCall - 读取文件:
{"args" : {"path" : "d:\\cursor-tap\\internal\\httpstream\\grpc.go" ,"offset" : 114 , "limit" : 60
shellToolCall - 执行命令(参数最复杂):
{"args" : {"command" : "go build ./cmd/cursor-tap/" ,"workingDirectory" : "d:\\cursor-tap" ,"timeout" : 30000 ,"simpleCommands" : ["go" ],"parsingResult" : {"executableCommands" : [{"name" : "go" ,"args" : [{"type" : "word" , "value" : "build" }, {"type" : "word" , "value" : "./cmd/cursor-tap/" }],"fullText" : "go build ./cmd/cursor-tap/" "requestedSandboxPolicy" : {"type" : "TYPE_WORKSPACE_READWRITE" ,"networkAccess" : false ,"additionalReadwritePaths" : ["d:\\cursor-tap" ],"blockGitWrites" : true ,"enableSharedBuildCache" : true "fileOutputThresholdBytes" : "40000" ,"timeoutBehavior" : "TIMEOUT_BEHAVIOR_BACKGROUND" ,"hardTimeout" : 86400000
注意 parsingResult 字段,Cursor 会预先解析命令,提取出可执行命令列表。requestedSandboxPolicy 定义了沙箱策略:只读/读写、网络访问、Git 写入限制等。
grepToolCall - 代码搜索:
{"args" : {"pattern" : "strings\\." ,"path" : "d:\\cursor-tap\\internal\\httpstream\\recorder.go" ,"caseInsensitive" : false ,"multiline" : false
lsToolCall - 列目录:
{"args" : {"path" : "d:\\cursor-tap\\internal"
updateTodosToolCall - 待办管理:
{"args" : {"todos" : ["id" : "api-hub" ,"content" : "创建 internal/api/hub.go - WebSocket 广播中心" ,"status" : "TODO_STATUS_IN_PROGRESS" ,"createdAt" : "1769586599326" ,"updatedAt" : "1769586633448" "merge" : true
一个工具调用的完整生命周期是这样的:
[T+0ms] partialToolCall - 开始,只有工具名
工具执行结果的结构因工具而异:
shellToolCall result :
{"result" : {"isBackground" : false ,"success" : {"command" : "go build ./cmd/cursor-tap/" ,"workingDirectory" : "d:\\cursor-tap" ,"executionTime" : 3854 ,"interleavedOutput" : ""
readToolCall result :
{"result" : {"success" : {"totalLines" : 389 ,"fileSize" : 11135 ,"path" : "d:\\cursor-tap\\cmd\\cursor-tap\\main.go" ,"readRange" : {"startLine" : 1 , "endLine" : 389 },"contentBlobId" : "kXo3vHlnoCjePBlNBn0P07b1GR6dtILZzTeo0OWHnHg="
注意 readToolCall 的结果里有个 contentBlobId,实际文件内容存在 KV 存储里,通过 blob ID 引用。
lsToolCall result :
{"result" : {"success" : {"directoryTreeRoot" : {"absPath" : "d:\\cursor-tap\\internal" ,"childrenDirs" : ["absPath" : "d:\\cursor-tap\\internal\\ca" ,"childrenFiles" : [{"name" : "ca.go" }],"childrenWereProcessed" : true
服务端执行通道 (execServerMessage) sequenceDiagram
这是一个关键的架构细节:execServerMessage 是服务端发给客户端 的执行请求,而不是反过来。
根据 proto 定义:
message ExecServerMessage uint32 id = 1 ;string exec_id = 15 ;optional SpanContext span_context = 19 ;oneof message {2 ;3 ;4 ;5 ;7 ;8 ;service ExecService rpc Exec(ExecServerMessage) returns (stream ExecStreamElement)
这是一个反向调用 模式。AI 模型运行在 Cursor 云端,无法直接访问用户的本地文件。服务端通过 execServerMessage 告诉客户端(IDE)需要执行什么操作,客户端执行后通过 ExecStreamElement 流返回结果。
实际操作类型分布:
readArgs: 230 (读取文件)
shellStreamArgs 的结构包含完整的沙箱策略:
{"execId" : "xxx" ,"shellStreamArgs" : {"command" : "go build ./cmd/cursor-tap/" ,"workingDirectory" : "d:\\cursor-tap" ,"timeout" : 30000 ,"requestedSandboxPolicy" : {"type" : "TYPE_WORKSPACE_READWRITE" ,"networkAccess" : false ,"additionalReadwritePaths" : ["d:\\cursor-tap" ],"blockGitWrites" : true ,"enableSharedBuildCache" : true "timeoutBehavior" : "TIMEOUT_BEHAVIOR_BACKGROUND" ,"hardTimeout" : 86400000
这说明 Cursor 的工具执行有完整的沙箱隔离,包括网络访问控制、Git 写入限制、超时策略等。客户端需要在沙箱内执行命令,然后返回结果。这种反向调用模式是 Cursor 架构的核心:模型在云端运行,但所有文件操作和命令执行都发生在用户本地,服务端只能通过请求-响应的方式间接访问用户环境。
与工具执行同样重要的是上下文管理。Cursor 使用 KV 存储机制来缓存对话片段,这套机制和会话状态紧密结合。
KV 存储机制 sequenceDiagram
kvServerMessage 用于存储和检索对话片段的缓存:
setBlobArgs: 1406 (存储)
完整的请求-响应结构 message KvServerMessage uint32 id = 1 ; optional SpanContext span_context = 4 ;oneof message {2 ; 3 ; message SetBlobArgs bytes blob_id = 1 ; bytes blob_data = 2 ; message GetBlobArgs bytes blob_id = 1 ; message KvClientMessage uint32 id = 1 ; oneof message {2 ;3 ;message SetBlobResult optional Error error = 1 ; message GetBlobResult optional bytes blob_data = 1 ;
请求-响应匹配 通过 id 字段匹配 KV 请求和响应:
[T+0ms] S2C KvServer:SetBlob {"id":3, "blobId":"4kzyYt...", "blobDataSize":508}
完整的 KV 交互流程 这是一个服务端控制、客户端存储 的模式。KV 存储和会话状态紧密结合,贯穿整个对话生命周期。
场景一:会话开始,服务端推送上下文
用户发送第一条消息后,服务端不会立即开始生成回复。它首先通过一连串 SetBlob 操作把历史上下文推送到客户端缓存。这些内容包括之前对话的摘要、历史消息的 blob 引用、待处理的工具调用状态等。客户端收到后存储到本地,返回确认。只有当所有必要的上下文都缓存完毕,服务端才开始调用模型。
[T+0ms] C2S runRequest 用户发送 "帮我优化这段代码"
场景二:模型需要历史数据,发起读取请求
模型生成过程中可能需要引用之前的对话内容。服务端在 conversationState.turns 里只存了 blobId 列表,实际内容在客户端。当模型需要某个历史消息时,服务端发送 GetBlobArgs 请求,客户端从本地缓存取出数据返回。
[T+5000ms] S2C thinkingDelta "根据之前的讨论..."
这种按需加载的设计意味着服务端不需要一次性加载全部历史。对于长对话,只有被模型实际引用的片段才会从客户端取回。
场景三:模型生成内容,写入缓存
模型每生成一段完整内容(一轮思考、一次工具调用、一段回复),服务端就把它存到客户端缓存。blobId 是内容的 hash,相同内容不会重复存储。
[T+8000ms] S2C toolCallCompleted Shell 执行完成
场景四:断线重连,恢复上下文
如果连接中断,客户端重新发起请求时会带上 conversationState。服务端根据 turns 里的 blobId 列表判断哪些内容需要从客户端取回。由于数据已经缓存在客户端本地,即使服务端没有持久化这些内容,对话也能完整恢复。
[断线后重连]
KV 与 conversationState 的关系
conversationState 是对话的骨架,记录了所有内容的 blobId 引用。rootPromptMessagesJson 存储系统提示词的 blobId 列表,turns 存储每轮对话的 blobId 列表,todos 存储待办事项的 blobId,plan 存储当前计划的 blobId。服务端通过这些 ID 知道需要哪些数据,然后按需从客户端 KV 缓存中读取。
这套设计的核心思想是把客户端当作分布式缓存节点。服务端只维护索引(blobId 列表),实际内容存在用户本地。好处是用户数据不在云端持久化,相同内容只传输一次,连接断开也能恢复。代价是客户端必须维护可靠的本地存储,如果缓存丢失,对话历史就无法恢复。
Blob 数据内容 解码 blob 数据后,发现主要有三类内容:
**1. Assistant 消息 (约 84 个 blobs)**:存储 AI 的回复
{"id" : "1" ,"role" : "assistant" ,"content" : ["type" : "reasoning" ,"text" : "Now build to verify." ,"providerOptions" : {"cursor" : {"modelName" : "claude-4.5-opus-high-thinking" }"signature" : "ErwBCkYICxgCKkAhMRmRyrCdeWMgxe61O9ZaqQckrofZra..." "type" : "tool-call" ,"toolCallId" : "toolu_012k7YoRScc3E8Gwk2ZdWzzr" ,"toolName" : "Shell" ,"args" : {"command" : "go build ./cmd/cursor-tap/" }
**2. 对话摘要 (约 1322 个 blobs)**:当上下文过长时生成的摘要
用户展示了 JSONL 输出,其中最后一条记录有错误:
**3. 上下文索引 (protobuf 二进制)**:嵌套的 blob ID 列表,用于组织对话结构
KV 与对话检查点的关系:conversationCheckpointUpdate 里的 rootPromptMessagesJson 和 turns 字段都是 blob ID 列表,实际内容存在客户端 KV 里。这种设计允许服务端按需获取特定的对话片段,而不用每次都传输完整上下文。
云端 KV 与客户端 KV flowchart TB
从 proto 定义来看,KV 存储实际上有两层:
1. 客户端 KV 缓存 :通过 KvServerMessage/KvClientMessage 在 Agent 通道(BidiAppend/RunSSE)中操作。服务端控制读写,客户端被动响应。这是普通对话场景使用的机制。
2. 云端 KV 存储 :存在一个独立的 RPC 接口 BackgroundComposerService.GetBlobForAgentKV:
message GetBlobForAgentKVRequest string bc_id = 1 ; bytes blob_id = 2 ; message GetBlobForAgentKVResponse bytes blob_data = 1 ;
这说明服务端在生成 blob 时会同时存储到云端数据库。bc_id 参数表明这主要用于 Background Composer(后台代理)场景,允许客户端从云端恢复 blob 数据。
没有发现客户端主动存储到云端的接口 。整个 KV 体系是单向的:服务端生成数据 → 推送到客户端缓存 + 存储到云端。客户端只能被动接收和返回数据,不能主动写入。这种设计保证了数据一致性:所有 blob 都由服务端生成和控制,客户端只是缓存层。
用户消息的两种发送方式 深入分析 BidiAppend 数据后,发现用户消息有两种发送方式:
1. 初始消息 - 通过 run_request
每个新的 requestId 会话开始时,用户的第一条消息通过 AgentRunRequest.Action.userMessageAction.userMessage.text 发送:
其中也包含大量复杂的元数据信息
{"userMessageAction" : {"userMessage" : {"text" : "反序列化尾部有时候有问题 错误时增加写入原始数据记录用于调试" ,"messageId" : "xxxx-xxxx-xxx-xxx..." ,"selectedContext" : {"invocationContext" : {"ideState" : {"recentlyViewedFiles" : ["path" : "d:\\cursor-tap\\cursor_proto\\gen\\aiserver\\v1\\aiserver_v1.pb.go" ,"relativePath" : "cursor_proto/gen/aiserver/v1/aiserver_v1.pb.go" ,"totalLines" : 256894 "mode" : "AGENT_MODE_PLAN" ,"richText" : "{\"root\":{\"children\":[{\"children\":[{\"detail\":0,\"format\":0,\"mode\":\"normal\",\"style\":\"\",\"text\":\"反序列化尾部有时候有问题 错误时增加写入原始数据记录用于调试\",\"type\":\"text\",\"version\":1}],\"direction\":\"ltr\",\"format\":\"\",\"indent\":0,\"type\":\"paragraph\",\"version\":1}],\"direction\":\"ltr\",\"format\":\"\",\"indent\":0,\"type\":\"root\",\"version\":1}}" "requestContext" : {"rules" : ["fullPath" : "C:\\Users\\Administrator\\.codex\\skills\\.system\\skill-creator\\SKILL.md" ,"content" : "---\nname: skill-creator\ndescription: ........" ,"type" : {"agentFetched" : {"description" : "Guide for creating effective skills. This skill should be used when users want to create a new skill (or update an existing skill) that extends Codex's capabilities with specialized knowledge, workflows, or tool integrations." "fullPath" : "C:\\Users\\Administrator\\.codex\\skills\\.system\\skill-installer\\SKILL.md" ,"content" : "---\nname: skill-installer\ndescription: Install Codex skills into $CODEX_HOME/skills from a curated list or a GitHub repo path. ......\n" ,"type" : {"agentFetched" : {"description" : "Install Codex skills into $CODEX_HOME/skills from a curated list or a GitHub repo path. Use when a user asks to list installable skills, install a curated skill, or install a skill from another repo (including private repos)." "fullPath" : "C:\\Users\\Administrator\\.cursor\\skills-cursor\\create-rule\\SKILL.md" ,"content" : "---\nname: create-rule\ndescription: Create Cursor rules for persistent AI guidance. Use when the user wants to create a rule, add coding standards, set up project conventions, configure file-specific patterns, create RULE.md files, or asks about .cursor/rules/ or AGENTS.md.\n---......." ,"type" : {"agentFetched" : {"description" : "Create Cursor rules for persistent AI guidance. Use when the user wants to create a rule, add coding standards, set up project conventions, configure file-specific patterns, create RULE.md files, or asks about .cursor/rules/ or AGENTS.md." "fullPath" : "C:\\Users\\Administrator\\.cursor\\skills-cursor\\create-skill\\SKILL.md" ,"content" : "---\nname: create-skill\ndescription: Guides users through creating effective Agent Skills for Cursor. Use when the user wants to create, write, or author a new skill, or asks about skill structure, best practices, or SKILL.md format.\n---\n# Creating Skills in Cursor\n\nThis skill guides you through creating effective Agent Skills for Cursor. Skills are markdown files that teach the agent how to perform specific tasks: reviewing PRs using team standards, generating commit messages in a preferred format, querying database schemas, or any specialized workflow........" ,"type" : {"agentFetched" : {"description" : "Guides users through creating effective Agent Skills for Cursor. Use when the user wants to create, write, or author a new skill, or asks about skill structure, best practices, or SKILL.md format." "fullPath" : "C:\\Users\\Administrator\\.cursor\\skills-cursor\\create-subagent\\SKILL.md" ,"content" : "---\nname: create-subagent\ndescription: Create custom subagents for specialized AI tasks. Use when the user wants to create a new type of subagent, set up task-specific agents, configure code reviewers, debuggers, or domain-specific assistants with custom prompts.\ndisable-model-invocation: true\n---......" ,"type" : {"agentFetched" : {"description" : "Create custom subagents for specialized AI tasks. Use when the user wants to create a new type of subagent, set up task-specific agents, configure code reviewers, debuggers, or domain-specific assistants with custom prompts." "fullPath" : "C:\\Users\\Administrator\\.cursor\\skills-cursor\\migrate-to-skills\\SKILL.md" ,"content" : "---\nname: migrate-to-skills\ndescription: Convert 'Applied intelligently' Cursor rules (.cursor/rules/*.mdc) and slash commands (.cursor/commands/*.md) to Agent Skills format (.cursor/skills/). Use when the user wants to migrate rules or commands to skills, convert .mdc rules to SKILL.md format, or consolidate commands into the skills directory.\ndisable-model-invocation: true\n---\n# Migrate Rules and Slash Commands to Skills\n\n....." ,"type" : {"agentFetched" : {"description" : "Convert 'Applied intelligently' Cursor rules (.cursor/rules/*.mdc) and slash commands (.cursor/commands/*.md) to Agent Skills format (.cursor/skills/). Use when the user wants to migrate rules or commands to skills, convert .mdc rules to SKILL.md format, or consolidate commands into the skills directory." "fullPath" : "C:\\Users\\Administrator\\.cursor\\skills-cursor\\update-cursor-settings\\SKILL.md" ,"content" : "---\nname: update-cursor-settings\ndescription: Modify Cursor/VSCode user settings in settings.json. Use when the user wants to change editor settings, preferences, configuration, themes, font size, tab size, format on save, auto save, keybindings, or any settings.json values.\n---\n# Updating Cursor Settings\n\nThis skill guides you through modifying Cursor/VSCode user settings. Use this when the user wants to change editor settings, preferences, configuration, themes, keybindings, or any `settings.json` values.\n\n## Settings File Location\n\n| OS | Path |\n|----|------|......" ,"type" : {"agentFetched" : {"description" : "Modify Cursor/VSCode user settings in settings.json. Use when the user wants to change editor settings, preferences, configuration, themes, font size, tab size, format on save, auto save, keybindings, or any settings.json values." "env" : {"osVersion" : "win32 10.0.123456" ,"workspacePaths" : ["d:\\cursor-tap" "shell" : "powershell" ,"sandboxEnabled" : true ,"terminalsFolder" : "C:\\Users\\Administrator\\.cursor\\projects\\c-code-project-cursor-tap/terminals" ,"agentSharedNotesFolder" : "C:\\Users\\Administrator\\.cursor\\projects\\c-code-project-cursor-tap/agent-notes/shared" ,"agentConversationNotesFolder" : "C:\\Users\\Administrator\\.cursor\\projects\\c-code-project-cursor-tap/agent-notes/xxxxx-xxxx-xxxx..." ,"timeZone" : "Asia/Shanghai" ,"projectFolder" : "C:\\Users\\Administrator\\.cursor\\projects\\c-code-project-cursor-tap" ,"agentTranscriptsFolder" : "C:\\Users\\Administrator\\.cursor\\projects\\c-code-project-cursor-tap/agent-transcripts" ,"sandboxSupported" : true "repositoryInfo" : ["relativeWorkspacePath" : "." ,"repoName" : "xxxxx-xxxx-xxxx..." ,"repoOwner" : "google-oauth2|user_0123456789xxxxxx" ,"isLocal" : true ,"orthogonalTransformSeed" : 123456789 ,"pathEncryptionKey" : "ueFt1xfWGHL2O53mg7AgSCZpby4DJnGz_49vD8h1A9c" "conversationNotesListing" : "(No notes directory yet - will be created when you write your first note)" ,"sharedNotesListing" : "(No notes directory yet - will be created when you write your first note)" ,"gitRepos" : ["path" : "d:/cursor-tap" ,"status" : "## main\n M test.jsonl\n" ,"branchName" : "main" "mcpInstructions" : ["serverName" : "cursor-ide-browser" ,"instructions" : "The cursor-ide-browser is an MCP server that allows you to navigate the web and interact with the page. Use this for frontend/webapp development and testing code changes........" "serverName" : "cursor-browser-extension" ,"instructions" : "The cursor-browser-extension is an MCP server that allows you to navigate the web and interact with the page. Please use this server if the user is asking about questions or tasks related to frontend / webapp development, and you are encouraged to test any of your code changes by using the tools from this MCP server." "webSearchEnabled" : true ,"mcpFileSystemOptions" : {"enabled" : true ,"workspaceProjectDir" : "C:\\Users\\Administrator\\.cursor\\projects\\c-code-project-cursor-tap" ,"mcpDescriptors" : ["serverName" : "cursor-ide-browser" ,"serverIdentifier" : "cursor-ide-browser" ,"folderPath" : "C:\\Users\\Administrator\\.cursor\\projects\\c-code-project-cursor-tap\\mcps\\cursor-ide-browser" ,"serverUseInstructions" : "The cursor-ide-browser is an MCP server that allows you to navigate the web and interact with the page. Use this for frontend/webapp development and testing code changes......." "serverName" : "cursor-browser-extension" ,"serverIdentifier" : "cursor-browser-extension" ,"folderPath" : "C:\\Users\\Administrator\\.cursor\\projects\\c-code-project-cursor-tap\\mcps\\cursor-browser-extension" ,"serverUseInstructions" : "The cursor-browser-extension is an MCP server that allows you to navigate the web and interact with the page. Please use this server if the user is asking about questions or tasks related to frontend / webapp development, and you are encouraged to test any of your code changes by using the tools from this MCP server." "serverName" : "自定义工具1" ,"serverIdentifier" : "user-cattool" ,"folderPath" : "C:\\Users\\Administrator\\.cursor\\projects\\c-code-project-cursor-tap\\mcps\\user-auditx" ,"tools" : ["toolName" : "read_file" ,"definitionPath" : "C:\\Users\\Administrator\\.cursor\\projects\\c-code-project-cursor-tap\\mcps\\user-cattool\\tools\\read_file.json" "webFetchEnabled" : true ,"commitAttributionMessage" : "enabled" ,"prAttributionMessage" : "enabled" ,"hooksConfig" : {}"rootPromptMessagesJson" : ["xxxxxxxxxxxxxxxxxxx=" , "turns" : ["xxxxxxxxxxxxxxxxxxx=" ,"todos" : ["xxxxxxxxxxxxxxxxxxx=" ,"tokenDetails" : {"usedTokens" : 52013 ,"maxTokens" : 176000 "plan" : "xxxxxxxxxxxxxxxxxxx=" , "previousWorkspaceUris" : ["file:///app/backend/server/XXXXXXX" "mode" : "AGENT_MODE_PLAN" ,"summaryArchives" : ["plan" : "xxxxxxxxxxxxxxxxxxx=" , "subagentStates" : {"fa7c72d8-ba67-4d9d-82fc-63d0aefdf6ad" : {"conversationState" : {"rootPromptMessagesJson" : ["xxxxxxxxxxxxxxxxxxx=" ,"turns" : ["xxxxxxxxxxxxxxxxxxx=" "tokenDetails" : {"usedTokens" : 54816 ,"maxTokens" : 200000 "previousWorkspaceUris" : ["file:///app/backend/server/xxxxxxxx" "mode" : "AGENT_MODE_ASK" ,"readPaths" : ["d:\\cursor-tap\\internal\\proxy\\server.go" ,"d:\\cursor-tap\\cmd\\cursor-tap\\main.go" "createdTimestampMs" : "123456789" ,"lastUsedTimestampMs" : "123456789" ,"subagentType" : {"explore" : {}"readPaths" : ["d:\\cursor-tap\\cmd\\cursor-tap\\main.go" ,"d:\\cursor-tap\\internal\\mitm\\keylog.go" ,"d:\\cursor-tap\\internal\\mitm\\interceptor.go" ,"d:\\cursor-tap\\pkg\\types\\types.go" ,"d:\\cursor-tap\\internal\\mitm\\detect.go" ,"d:\\cursor-tap\\internal\\mitm\\dialer.go" ,"d:\\cursor-tap\\internal\\ca\\ca.go" ,"d:\\cursor-tap\\cmd\\inline\\main.go" ,"d:\\cursor-tap\\internal\\proxy\\server.go" ,"c:\\Users\\Administrator\\.cursor\\plans\\http_stream_parser_5192a30b.plan.md" ,"d:\\cursor-tap\\internal\\httpstream\\parser.go" ,"d:\\cursor-tap\\internal\\httpstream\\recorder.go" ,"d:\\cursor-tap\\cursor_proto\\gen\\aiserver\\v1\\aiserver_v1.pb.go" ,"d:\\cursor-tap\\internal\\httpstream\\types.go" ,"d:\\cursor-tap\\internal\\httpstream\\logger.go" ,"d:\\cursor-tap\\internal\\httpstream\\grpc.go"
conversationState 包含两个关键数组。rootPromptMessagesJson 存储系统提示词的 blob ID 列表,turns 存储之前对话轮次的 blob ID 列表。
2. 后续消息 - 通过 conversation_action
同一个 requestId 会话内,用户的后续消息通过 ConversationAction.userMessageAction.userMessage.text 发送:
{"conversationAction" : {"userMessageAction" : {"userMessage" : {"text" : "树状图 没有层次感" ,"messageId" : "cd932580-794a-4ccc-928f-07c9fcb00075" ,
BidiAppend 消息类型 C2S 方向 - AgentClientMessage:
字段号
Hex前缀
类型
说明
1
0arun_request初始对话请求,包含用户消息和完整上下文
2
12exec_client_message工具执行结果返回给服务端
3
1akv_client_messageKV 存储响应(GetBlobResult/SetBlobResult)
4
22conversation_action对话动作,包括后续用户消息
5
2aexec_client_control_message执行流控制(如 streamClose)
6
32interaction_response用户交互响应(回答 AI 提问)
7
3aclient_heartbeat心跳保活
8
42prewarm_request预热请求
S2C 方向 - AgentServerMessage:
字段号
Hex前缀
类型
说明
1
0ainteraction_updateAI 交互更新(文本/思考/工具调用等)
2
12exec_server_message执行请求(让客户端读文件/执行命令等)
3
1aconversation_checkpoint_update对话状态检查点
4
22kv_server_messageKV 存储请求(GetBlobArgs/SetBlobArgs)
5
2aexec_server_control_message执行流控制
7
3ainteraction_queryAI 向用户提问(结构化问答)
Hex 前缀计算方式:(field_number << 3) | wire_type,wire_type 2 表示 length-delimited。写解析器时只需要看第一个字节就能判断消息类型,这对于 debug 和流量分析非常方便。
对话检查点 flowchart TB
conversationCheckpointUpdate 是服务端定期发送的对话状态快照:
{"conversationCheckpointUpdate" : {"rootPromptMessagesJson" : ["blob1" , "blob2" , "blob3" ],"turns" : ["blobX" ],"pendingToolCalls" : ["{\"id\":\"1\",\"role\":\"assistant\",...}" ],"tokenDetails" : {"usedTokens" : 24231 ,"maxTokens" : 176000 "mode" : "AGENT_MODE_AGENT"
这里能看到几个关键信息。rootPromptMessagesJson 是系统提示词,存成 blob 引用。turns 是对话轮次,同样是 blob 引用。pendingToolCalls 是待处理的工具调用,直接内联 JSON 而不是 blob 引用。tokenDetails 记录了 token 使用情况,这里用了 24231/176000。mode 表明当前模式是 AGENT_MODE_AGENT。
检查点在对话过程中会周期性发送,客户端可以用它来同步状态、更新 UI 显示的 token 计数,以及在断线重连时恢复对话。检查点和 KV 存储配合使用:检查点告诉客户端有哪些 blob,KV 操作负责实际的数据传输。
消息组装流程 客户端首先收集 IDE 状态(recentlyViewedFiles、光标位置、打开的文件),然后收集环境信息(env、repositoryInfo、gitRepos、mcpInstructions),打包后通过 BidiAppend 的 runRequest.userMessageAction 发送。服务端接收后进行组装,将 IDE 状态转为 <open_and_recently_viewed_files> 标签,将用户输入包装为 <user_query> 标签,注入系统提示词(带各类 XML 标签),并存储到 KV blob。如果上下文过长,会生成摘要,内容前缀为 [Previous conversation summary]。
AI 向用户提问 interactionQuery 消息用于 AI 向用户反问:
{"interactionQuery" : {"askQuestionInteractionQuery" : {"args" : {"title" : "前端项目和后端 API 设计确认" ,"questions" : ["id" : "ws_port" ,"prompt" : "WebSocket 服务端口" ,"options" : ["id" : "same" , "label" : "与代理同端口(如 8080)" },"id" : "separate" , "label" : "独立端口(如 8081)" },"id" : "custom" , "label" : "自定义(请在聊天中说明)" }
这是结构化的多选题格式,UI 渲染成可点击的选项卡。用户点击后,客户端通过 interactionResponse 消息把选择结果发回服务端。这种设计让 AI 可以在需要澄清的时候主动询问用户,而不是盲目猜测。
完整对话时间线 分析一个 4840 帧的完整会话,消息类型分布:
S2C:interaction.tokenDelta: 2194 (token 计数)
时间线开头 (前 100 帧):
[ 1] 15:59:35.357 C2S REQUEST requestId=2540b5ca...
可以看到会话开始时,服务端首先通过大量 KV:set 操作把上下文片段存储到客户端,然后才开始 thinking/toolCall 等交互消息。这印证了前面讲的 KV 设计:上下文先推送到客户端缓存,模型生成过程中按需读取,生成的内容再写回缓存。整个对话就是围绕这套缓存机制运转的。
代码补全 (StreamCpp) 代码补全走的是 AiService/StreamCpp,和 Agent 对话走不同的服务。
请求结构 :
message StreamCppRequest enum ControlToken 0 ;1 ; 2 ; 3 ; 1 ; string prefix = 2 ; string suffix = 3 ; repeated RecentlyEditedRange recently_edited_ranges = 4 ; repeated RecentlyVisitedDocument recently_visited_documents = 5 ; string language_id = 6 ; optional bool supports_cpt = 27 ; optional bool supports_crlf_cpt = 28 ;
请求包含当前文件内容、光标位置前后的代码、最近编辑的代码范围、最近访问的文件列表。这些上下文让模型能生成更准确的补全。
实际响应数据 :
"modelInfo" : {"isFusedCursorPredictionModel" : true ,"isMultidiffModel" : true "rangeToReplace" : {"startLineNumber" : 14 ,"endLineNumberInclusive" : 14 "shouldRemoveLeadingEol" : true ,"bindingId" : "221c7e6a-bc6e-4823-bf30-56b565584fee:0"
isFusedCursorPredictionModel 表示这是融合了代码预测的模型,isMultidiffModel 表示支持多处修改。rangeToReplace 告诉客户端要替换第 14 行。bindingId 用于关联补全建议和用户操作,后续 RecordCppFate 会用这个 ID 上报用户是否接受了补全。
补全配置 (CppConfig) 代码补全的行为由服务端下发的配置控制。客户端启动时调用 CppService/CppConfig 获取配置,请求只带一个 supportsCpt: true 表示客户端支持 Cursor Prediction Target 功能。
实际响应数据(完整) :
{"aboveRadius" : 1 ,"belowRadius" : 2 ,"isOn" : true ,"isGhostText" : true ,"shouldLetUserEnableCppEvenIfNotPro" : true ,"heuristics" : ["HEURISTIC_REVERTING_USER_CHANGE" ,"HEURISTIC_OUTPUT_EXTENDS_BEYOND_RANGE_AND_IS_REPEATED" ,"HEURISTIC_SUGGESTING_RECENTLY_REJECTED_EDIT" ,"HEURISTIC_DUPLICATING_LINE_AFTER_SUGGESTION" "excludeRecentlyViewedFilesPatterns" : [".env" , ".production" , ".pem" , ".cursor-retrieval." ,".cursor-always-local." , ".svg" , ".lock" , ".jsonl" , ".csv" , ".tsv" , "Copilot++" "enableRvfTracking" : true ,"globalDebounceDurationMillis" : 70 ,"clientDebounceDurationMillis" : 50 ,"cppUrl" : "https://api3.cursor.sh" ,"useWhitespaceDiffHistory" : true ,"importPredictionConfig" : {"shouldTurnOnAutomatically" : true "checkFilesyncHashPercent" : 0.005 ,"recentlyRejectedEditThresholds" : {"hardRejectThreshold" : 2 ,"softRejectThreshold" : 5 "isFusedCursorPredictionModel" : true ,"maxNumberOfClearedSuggestionsSinceLastAccept" : 20 ,"suggestionHintConfig" : {"importantLspExtensions" : ["vscode.typescript-language-features" ,"ms-python.python" ,"rust-lang.rust-analyzer" ,"golang.go" "enabledForPathExtensions" : [".ts" , ".tsx" , ".py" , ".js" , ".go" , ".rs" ]"allowsTabChunks" : true ,"tabContextRefreshDebounceMs" : 1000 ,"tabContextRefreshEditorChangeDebounceMs" : 1000
aboveRadius 和 belowRadius 控制补全时考虑光标上下多少行的上下文。cppUrl 指定补全服务的 API 地址,和主 API 地址不同,用的是 api3.cursor.sh。
isGhostText 控制是否用灰色幽灵文本显示补全建议。防抖配置分两层,globalDebounceDurationMillis 是全局 70ms,clientDebounceDurationMillis 是客户端 50ms,避免用户快速输入时频繁触发补全请求。tabContextRefreshDebounceMs 控制 Tab 上下文刷新的防抖时间,1000ms。
heuristics 是启发式规则列表,用来过滤低质量的补全建议。HEURISTIC_REVERTING_USER_CHANGE 防止建议用户刚撤销的代码,HEURISTIC_SUGGESTING_RECENTLY_REJECTED_EDIT 防止重复建议用户刚拒绝的内容,HEURISTIC_OUTPUT_EXTENDS_BEYOND_RANGE_AND_IS_REPEATED 防止输出超出范围且重复的内容,HEURISTIC_DUPLICATING_LINE_AFTER_SUGGESTION 防止建议重复行。
excludeRecentlyViewedFilesPatterns 排除敏感文件和特殊文件。.env、.pem 这类敏感文件不会触发补全,避免泄露密钥。.lock、.jsonl、.csv 这类数据文件补全意义不大。.cursor-retrieval. 和 .cursor-always-local. 是 Cursor 内部使用的标记文件。Copilot++ 是历史遗留的排除模式。
recentlyRejectedEditThresholds 定义拒绝阈值。如果同一个补全建议被用户拒绝 2 次(hardRejectThreshold)就不再出现,拒绝 5 次(softRejectThreshold)会降低优先级。这让补全系统能学习用户的偏好。
suggestionHintConfig 里的 importantLspExtensions 列出了重要的语言服务扩展,这些扩展提供的语义信息会被优先考虑。enabledForPathExtensions 限制只对特定文件类型启用高级补全提示,目前是 TypeScript、Python、JavaScript、Go、Rust。
importPredictionConfig.shouldTurnOnAutomatically 控制 import 语句预测是否自动开启。checkFilesyncHashPercent 是文件同步哈希校验的采样率,0.5% 的请求会做校验。enableRvfTracking 启用最近访问文件的追踪。
Subagent 机制 Cursor 的 Agent 模式支持启动子代理(Subagent)来处理特定任务。从 BidiAppend 的 conversationState 可以看到实际的子代理状态。
实际流量数据示例 :
{"subagentStates" : {"fa7c72d8-xxxx-xxxx-xxxx-63d0aefdf6ad" : {"conversationState" : {"rootPromptMessagesJson" : ["xxxxxxxxxxxxxxxxxxx=" ],"turns" : ["xxxxxxxxxxxxxxxxxxx=" ],"tokenDetails" : {"usedTokens" : 54816 ,"maxTokens" : 200000 "mode" : "AGENT_MODE_ASK" ,"readPaths" : ["d:\\cursor-tap\\internal\\proxy\\server.go" ,"d:\\cursor-tap\\cmd\\cursor-tap\\main.go" "createdTimestampMs" : "1769586599326" ,"lastUsedTimestampMs" : "1769586633448" ,"subagentType" : {"explore" : {}}
Proto 定义的子代理类型 :
enum SubAgent 0 ;1 ; 2 ; 3 ; enum SubagentType 0 ;1 ; 2 ; 3 ; 4 ;
每个子代理有独立的 conversationState:
独立的 token 计数 :usedTokens: 54816, maxTokens: 200000独立的对话历史 :turns 数组存储 blob ID 引用独立的模式 :AGENT_MODE_ASK(Ask 模式,只读不修改)读取的文件列表 :readPaths 记录子代理访问过的文件
subagentType: {"explore": {}} 表示这是一个「探索」类型的子代理,专门用于在代码库中搜索和理解代码。
子代理生命周期控制 :
message ConversationAction oneof action {10 ;message CancelSubagentAction string subagent_id = 1 ;
当主代理需要取消一个正在运行的子代理时,发送 CancelSubagentAction 并指定 subagent_id(即 subagentStates 中的 UUID key)。
对话摘要机制 当对话变长、token 用量接近上限时,Cursor 会触发摘要机制压缩历史。从流量日志可以看到实际的摘要触发过程。
实际流量数据 :
// RunSSE 流的第 2664 帧 - 摘要开始
这两帧消息间隔约 34ms,说明摘要生成非常快(服务端已有历史上下文,只需要压缩)。
Proto 定义 :
message InteractionUpdate oneof message {9 ; 10 ; 11 ; message ConversationSummaryArchive repeated bytes summarized_messages = 1 ; string summary = 2 ; uint32 window_tail = 3 ; bytes summary_message = 4 ;
摘要后的用户消息格式 :
在 BidiAppend 数据中,被压缩的历史以特定前缀传递:
{"role" : "user" ,"content" : "[Previous conversation summary]: Summary:\n1. Primary Request and Intent:\n The user's overarching goal is to reverse-engineer the Cursor AI IDE's gRPC/Connect Protocol communication..."
conversationState 中的 self_summary_count 字段记录了当前会话被摘要的次数。在 8 万条请求的日志中,观察到 2 次摘要触发(分别在第 21249 条和第 51076 条记录),说明摘要只在上下文真正过长时才触发。
Skills 系统 Skills(技能)是 Cursor 的一种扩展机制,允许用户定义特定场景的提示词模板。从 BidiAppend 数据的 requestContext.rules 可以看到实际加载的 Skills。
*实际流量数据示例 :
{"rules" : ["fullPath" : "C:\\Users\\xxx\\.codex\\skills\\.system\\skill-creator\\SKILL.md" ,"content" : "---\nname: skill-creator\ndescription: Guide for creating effective skills. This skill should be used when users want to create a new skill (or update an existing skill) that extends Codex's capabilities with specialized knowledge, workflows, or tool integrations.\n---\n\n# Skill Creator\n\nThis skill provides guidance for creating effective skills..." ,"type" : {"agentFetched" : {"description" : "Guide for creating effective skills. This skill should be used when users want to create a new skill..." "fullPath" : "C:\\Users\\xxx\\.cursor\\skills-cursor\\create-rule\\SKILL.md" ,"content" : "---\nname: create-rule\ndescription: Create Cursor rules for persistent AI guidance. Use when the user wants to create a rule, add coding standards, set up project conventions...\n---\n# Creating Cursor Rules\n\nCreate project rules in `.cursor/rules/` to provide persistent context for the AI agent..." ,"type" : {"agentFetched" : {"description" : "Create Cursor rules for persistent AI guidance." "fullPath" : "C:\\Users\\xxx\\.cursor\\skills-cursor\\create-skill\\SKILL.md" ,"content" : "---\nname: create-skill\ndescription: Guides users through creating effective Agent Skills for Cursor...\n---\n# Creating Skills in Cursor\n\nThis skill guides you through creating effective Agent Skills..." ,"type" : {"agentFetched" : {"description" : "Guides users through creating effective Agent Skills for Cursor."
Skills 存储位置 :
系统 Skills:~/.codex/skills/.system/
用户 Skills:~/.cursor/skills-cursor/
项目 Skills:.cursor/skills/
Proto 定义 :
message SkillDescriptor string name = 1 ; string description = 2 ; string folder_path = 3 ; string content = 4 ; bool disable_model_invocation = 5 ; message CursorRuleType oneof type {1 ; 2 ; 3 ; 4 ;
agentFetched 类型的 Skills 是 Agent 根据用户意图动态获取的。Agent 会根据 description 字段判断当前任务是否需要加载这个 Skill。例如,当用户说”帮我创建一个 skill”时,Agent 会加载 create-skill 这个 Skill。
用量限制 Cursor 通过 DashboardService/GetUsageLimitPolicyStatus 接口检查用户的用量状态。
实际请求 :
POST /aiserver.v1.DashboardService/GetUsageLimitPolicyStatus
请求体为空,身份信息通过 Authorization header 携带。
实际响应 :
{"canConfigureSpendLimit" : true }
在这个账户的测试环境下,响应非常简洁。canConfigureSpendLimit: true 表示用户可以配置消费限制。没有 is_in_slow_pool 字段说明用户当前不在慢速池中。
Proto 定义 :
message GetUsageLimitPolicyStatusResponse bool is_in_slow_pool = 1 ; optional string error_title = 2 ; optional string error_detail = 3 ; optional int32 slowness_ms = 4 ; string , string > features = 5 ; bool can_configure_spend_limit = 6 ; optional string limit_type = 7 ; bool has_pending_request = 8 ; repeated string allowed_model_ids = 9 ; repeated string allowed_model_tags = 10 ;
is_in_slow_pool 是关键字段。当用户用量超出配额时,会被放入「慢速池」,请求会被人为延迟 slowness_ms 毫秒。这是一种软限制,不会完全阻止使用,但会降低体验。
Token 用量追踪 :
conversationState.tokenDetails 记录了当前会话的 token 使用情况:
{"tokenDetails" : {"usedTokens" : 52013 ,"maxTokens" : 176000
当 usedTokens 接近 maxTokens 时,Cursor 会触发摘要机制压缩历史,而不是直接报错。
指标上报 Cursor 客户端通过 AiService/ReportClientNumericMetrics 定期上报各种指标。从流量日志可以看到具体上报了什么。
实际请求数据示例 :
{"metrics" : ["metric" : "client.loadedComposers.ids.length" ,"value" : 6 ,"sessionId" : "1d522754-xxxx-xxxx-xxxx-90a5c5e6cd40" ,"ffHash" : "d919aa2bf0f422e3" ,"timestampMs" : "1769585947079" ,"clientVersion" : "2.4.21" ,"os" : "win32" ,"enabledExtensionsHash" : "5b9ab05108738b61" ,"ffResolved" : "" ,"extensionsResolved" : "" "metric" : "client.refById.size" ,"value" : 6 ,"sessionId" : "1d522754-xxxx-xxxx-xxxx-90a5c5e6cd40" ,"ffHash" : "d919aa2bf0f422e3" ,"timestampMs" : "1769585947079" ,"clientVersion" : "2.4.21" ,"os" : "win32" ,"enabledExtensionsHash" : "5b9ab05108738b61" "metric" : "client.simulated_thinking_duration_ms" ,"value" : 4641 ,"sessionId" : "1d522754-xxxx-xxxx-xxxx-90a5c5e6cd40" ,"timestampMs" : "1769586055481" ,"clientVersion" : "2.4.21" ,"os" : "win32"
实际上报的指标类型 :
client.loadedComposers.ids.length - 加载的 Composer 数量client.refById.size - 引用缓存大小client.dirtyComposers.size - 脏 Composer 数量client.simulated_thinking_duration_ms - 模拟思考时长(毫秒)
从流量统计看,ReportClientNumericMetrics 调用了 451 次,是调用频率较高的接口之一(约 60 秒上报一次)。
Proto 定义 :
message ClientNumericMetric string metric = 1 ; double value = 2 ; optional string session_id = 3 ; optional string ff_hash = 4 ; int64 timestamp_ms = 5 ; optional string client_version = 6 ; optional string os = 7 ; optional string enabled_extensions_hash = 8 ;
这些指标帮助 Cursor 团队监控产品健康度和优化用户体验。ffHash 是 Feature Flag 的哈希,用于 A/B 测试分组。
用户行为事件 (Batch) 除了数值指标,Cursor 还通过 AiService/Batch 批量上报用户行为事件。这些事件比数值指标更细粒度,记录了用户的具体操作。从流量日志里提取出来的事件类型有 40 多种,覆盖了用户与 Cursor 交互的方方面面。
Composer 相关事件 :composer.submit(提交请求)、composer.new_chat(新建对话)、composer.cancel_chat(取消对话)、composer.accept_diff(接受代码变更)、composer.reject_diff(拒绝代码变更)、composer.accept_diff_file(按文件接受)、composer.reject_diff_file(按文件拒绝)、composer.diff_file(单文件变更统计)、composer.diff_summary(整体变更统计)、composer.context.add(添加上下文)、composer.visibility_summary(可见时长统计)、composer.model_picker_slug_periodic(模型选择记录)。
Plan 模式事件 :composer.plan_mode.plan_created(Plan 创建)、composer.plan_mode.plan_accepted(Plan 接受)、composer.plan_mode.plan_manually_edited(Plan 手动编辑)、composer.shift_tab_plan_render(Plan 渲染)。
Tab 补全事件 :tab.suggestion(补全建议出现)、tab.reject(补全被拒绝)。
客户端状态事件 :client.startup_metadata(启动元数据)、client.agent_turn_outcome(Agent 对话结果)、client.git_telemetry_started(Git 遥测)、client.time_to_chat_load_ms(聊天加载时间)、client.workspace_info(工作区信息)。
其他事件 :browser_visibility(浏览器标签页数量)、terminal_tip.shown(终端提示显示)、terminal_tip.dismissed(终端提示关闭)、bug_bot.panel_impression(Bug Bot 面板展示)、systemNotification.shown(系统通知显示)。
实际事件数据示例 :
"event" : "composer.accept_diff" ,"properties" : {"composerId" : "f62e72f9-d035-4534-b05c-b9dcdda04c0c" ,"fileExtension" : "go" ,"linesAdded" : 105 ,"linesRemoved" : 19 ,"model" : "claude-4.5-opus-high-thinking" ,"source" : "composer_commit" ,"uiSource" : "composer" "event" : "tab.suggestion" ,"properties" : {"cppSource" : "typing" ,"fileExtension" : "go" ,"linesAdded" : 1 ,"linesRemoved" : 1 ,"model" : "tab" ,"requestId" : "221c7e6a-bc6e-4823-bf30-56b565584fee" "event" : "tab.reject" ,"properties" : {"cppSource" : "typing" ,"fileExtension" : "go" ,"requestId" : "221c7e6a-bc6e-4823-bf30-56b565584fee" "event" : "composer.plan_mode.plan_created" ,"properties" : {"composerId" : "f62e72f9-d035-4534-b05c-b9dcdda04c0c" ,"iteration_number" : 1 ,"model" : "claude-4.5-opus-high-thinking"
tab.suggestion 和 tab.reject 里的 requestId 就是 StreamCpp 响应里的 bindingId,和 RecordCppFate 配合形成完整的补全追踪链路。composer.accept_diff 和 composer.reject_diff 记录用户对 AI 生成代码的接受率,source 字段区分是从 Composer 面板还是编辑器内触发的操作。
这套事件系统让 Cursor 团队能够细粒度地了解用户行为:哪些功能被频繁使用、用户在哪些环节容易放弃、代码变更的接受率是多少、不同模型的表现差异等。
模型选择 Cursor 通过 AiService/AvailableModels 接口获取可用模型列表。
实际请求 :
{"excludeMaxNamedModels" : true , "useModelParameters" : false }
实际响应示例 :
{"models" : ["name" : "default" ,"defaultOn" : true ,"supportsAgent" : true ,"degradationStatus" : "DEGRADATION_STATUS_UNSPECIFIED" ,"tooltipData" : {"markdownContent" : "**Auto**<br />Good default for everyday tasks, balanced for quality and speed." "supportsThinking" : false ,"supportsImages" : true ,"supportsMaxMode" : true ,"supportsNonMaxMode" : true ,"clientDisplayName" : "Auto" ,"serverModelName" : "default" ,"isRecommendedForBackgroundComposer" : false ,"supportsPlanMode" : true ,"supportsSandboxing" : true ,"inputboxShortModelName" : "Auto" "name" : "composer-1" ,"defaultOn" : true ,"supportsAgent" : true ,"degradationStatus" : "DEGRADATION_STATUS_UNSPECIFIED" ,"tooltipData" : {"markdownContent" : "**Composer 1**<br />Cursor's first agentic coding model.<br /><br />200k context window" "supportsThinking" : false ,"supportsImages" : true ,"clientDisplayName" : "Composer 1" ,"serverModelName" : "composer-1" ,"supportsPlanMode" : true ,"supportsSandboxing" : false ,"supportsCmdK" : false "name" : "claude-4.5-opus-high" ,"supportsAgent" : true ,"degradationStatus" : "DEGRADATION_STATUS_UNSPECIFIED" ,"tooltipData" : {"markdownContent" : "**Opus 4.5**<br />Anthropic's smartest model, great for difficult tasks.<br /><br />200k context window<br /><br />*Version: high effort*" "supportsThinking" : false ,"supportsImages" : true ,"supportsMaxMode" : true ,"supportsNonMaxMode" : true ,"clientDisplayName" : "Opus 4.5" ,"serverModelName" : "claude-4.5-opus-high" ,"supportsPlanMode" : true ,"supportsSandboxing" : true ,"inputboxShortModelName" : "Opus 4.5"
关键字段说明 :
degradationStatus: "DEGRADATION_STATUS_UNSPECIFIED" - 模型正常运行,没有降级supportsAgent: true - 支持 Agent 模式supportsPlanMode: true - 支持 Plan 模式supportsSandboxing: true/false - 是否支持沙箱执行supportsThinking: false - 是否支持思考模式(显式推理)supportsImages: true - 支持图片输入defaultOn: true - 默认启用
在对话中使用的模型 :
从 BidiAppend 数据的 providerOptions 可以看到当前使用的模型:
{"providerOptions" : {"cursor" : {"modelName" : "claude-4.5-opus-high-thinking"
Cursor 会在启动时调用 AvailableModels 获取模型列表,并根据用户的订阅状态决定可用模型。composer-1 是 Cursor 自己训练的 agentic coding 模型。
补全结果追踪 (RecordCppFate) 前面代码补全部分提到响应里有个 bindingId,这个 ID 用来追踪用户最终是接受还是拒绝了补全建议。用户做出选择后,客户端会调用 CppService/RecordCppFate 上报结果。
实际数据 :
{"requestId" : "221c7e6a-bc6e-4823-bf30-56b565584fee" ,"performanceNowTime" : 18580126 ,"fate" : "CPP_FATE_REJECT" ,"extension" : "go"
requestId 就是补全响应里的 bindingId。fate 有四种状态:
enum CppFate 0 ;1 ; 2 ; 3 ;
performanceNowTime 是用户做出决定时的时间戳(毫秒),可以用来计算用户看到补全建议后多久做出决定。extension 是文件扩展名,用于按语言统计补全接受率。
这套追踪机制让 Cursor 可以持续优化补全模型——知道哪些补全被接受、哪些被拒绝、用户在不同语言下的接受率如何。
AI 生成 Git 提交消息 (WriteGitCommitMessage) Cursor 可以根据代码变更自动生成 Git 提交消息。调用 AiService/WriteGitCommitMessage,发送 diff 内容,返回生成的提交消息。
实际请求 :
{"diffs" : ["diff --git a/internal/httpstream/grpc.go b/internal/httpstream/grpc.go\nindex 39433c8..f42157a 100644\n--- a/internal/httpstream/grpc.go\n+++ b/internal/httpstream/grpc.go\n@@ -1,10349 +1,1771 @@\n-// old code\n+// new code..."
实际响应 :
{"commitMessage" : "Enhance gRPC message handling in HTTP stream parser\n\n- Added support for handling empty gRPC messages, allowing for valid empty protobuf messages and empty JSON representations.\n- Updated the GRPCMessage structure to include raw frame data for better error debugging.\n- Enhanced the logging of gRPC messages to include raw data when errors occur, improving traceability and debugging capabilities."
服务端会分析 diff 内容,生成符合 conventional commit 风格的提交消息。标题是一句话概括变更目的,正文用列表说明具体改了什么。
Feature Flag 系统 (BootstrapStatsig) Cursor 使用 Statsig 做 A/B 测试和功能开关。启动时调用 AiService/BootstrapStatsig 获取当前用户的实验配置。
实际响应(部分) :
{"config" : "{ \"can_record_session\": true, \"dynamic_configs\": { \"101783700\": { \"group\": \"launchedGroup\", \"group_name\": \"control\", \"is_experiment_active\": false, \"is_user_in_experiment\": false, \"value\": {\"group\": \"control\"} }, \"1020226244\": { \"explicit_parameters\": [\"model\"], \"group\": \"abandoned\", \"is_experiment_active\": false, \"is_in_layer\": true, \"value\": {\"model\": \"\"} } } }"
config 是一个 JSON 字符串,包含大量实验配置。每个实验有唯一 ID,关键字段包括:
is_experiment_active - 实验是否还在进行is_user_in_experiment - 当前用户是否在实验组group - 用户被分配到哪个组(control/treatment/launched 等)value - 实验参数值
这套系统让 Cursor 可以灰度发布新功能,对不同用户群体测试不同的模型、UI、参数配置。客户端会根据这些配置决定启用哪些功能。
Cursor 会根据对话内容自动给 Tab 生成标题。调用 AiService/NameTab,发送对话消息,AI 返回生成的标题和推理过程。
实际请求 :
{"messages" : [{"text" : "测试" ,"type" : "MESSAGE_TYPE_HUMAN" ,"bubbleId" : "2cc85e8d-03cb-46cd-bc24-f3353b4c1fd3" ,"unifiedMode" : "UNIFIED_MODE_AGENT"
实际响应 :
{"name" : "测试会话" ,"reason" : "This chat is about a test or a test session.\n<name>测试会话</name>"
reason 字段暴露了 AI 的推理过程,它会用英文分析对话内容,然后在 <name> 标签里输出最终的标题。这个标签格式说明服务端是用正则或解析器从 AI 输出里提取标题的。
@Docs 文档索引 (AvailableDocs) Cursor 的 @Docs 功能背后是一个预置的文档索引库。调用 AiService/AvailableDocs 可以获取所有可用的文档列表。
实际响应(部分) :
{"docs" : ["docIdentifier" : "docidx-48838318-..." , "metadata" : {"docName" : "Accord.NET" , "prefixUrl" : "http://accord-framework.net/docs/..." , "public" : true }},"docIdentifier" : "docidx-274878b2-..." , "metadata" : {"docName" : "Active Admin" , "prefixUrl" : "https://activeadmin.info/..." , "public" : true }},"docIdentifier" : "docidx-6fe5c07c-..." , "metadata" : {"docName" : "Angular" , "prefixUrl" : "https://angular.io/docs/..." , "public" : true }}
目前预置了 464 个文档索引,覆盖了几乎所有主流框架和工具:前端有 Angular、React、Vue、Svelte;后端有 Django、Rails、Spring、Express;云服务有 AWS、GCP、Azure;AI/ML 有 TensorFlow、PyTorch、Hugging Face;还有 Kubernetes、Docker、Terraform 这些 DevOps 工具。用户在对话里输入 @Docs 就能搜索这些预索引的文档内容。
服务端全局配置 (GetServerConfig) Cursor 启动时会调用 AiService/GetServerConfig 获取服务端下发的全局配置。这个配置控制了客户端的很多行为参数。
实际响应(部分) :
{"indexingConfig" : {"absoluteMaxNumberFiles" : 100000 ,"maxConcurrentUploads" : 64 ,"autoIndexingMaxNumFiles" : 50000 ,"defaultUserPathEncryptionKey" : "xxxxxxxxxxxxxxx" ,"maxBatchBytes" : 2097152 ,"maxSyncMerkleBatchSize" : 50 "chatConfig" : {"fullContextTokenLimit" : 30000 ,"maxRuleLength" : 100000 ,"maxMcpTools" : 100 ,"warnMcpTools" : 80 ,"summarizationMessage" : "Chat context summarized." ,"listDirV2PredefinedIgnoreGlobs" : ["**/node_modules/*" , "**/__pycache__/*" , "**/.*" ]"backgroundComposerConfig" : {"enableBackgroundAgent" : true ,"maxWindowInWindows" : 10 ,"windowInWindowPreloadCount" : 8 "modelMigrations" : ["previousModel" : "claude-4-sonnet" , "targetModel" : "claude-4.5-sonnet" , "modelSetting" : "composer" },"previousModel" : "claude-4-sonnet-thinking" , "targetModel" : "claude-4.5-sonnet-thinking" , "modelSetting" : "composer" }
indexingConfig 里的 defaultUserPathEncryptionKey 应该就是前面”路径加密”部分分析的那个密钥。absoluteMaxNumberFiles 限制最多索引 10 万个文件,超过这个数量的大型 monorepo 只能部分索引。
chatConfig 里 fullContextTokenLimit: 30000 限制完整上下文最多 3 万 token,超过这个限制就会触发对话摘要。maxMcpTools: 100 和 warnMcpTools: 80 控制 MCP 工具数量,超过 80 个会警告,超过 100 个会拒绝。listDirV2PredefinedIgnoreGlobs 预定义了 node_modules、__pycache__、隐藏文件等忽略模式,这些目录不会出现在 AI 的目录列表里。
modelMigrations 记录了模型迁移计划。Cursor 在升级模型版本时不会直接切换,而是通过这个配置逐步迁移用户。这条配置说明 Cursor 正在把 claude-4-sonnet 用户迁移到 claude-4.5-sonnet。
backgroundComposerConfig 控制后台 Agent 功能,maxWindowInWindows: 10 限制最多 10 个后台任务窗口。
隐私模式 (PrivacyMode) Cursor 支持隐私模式,开启后代码和对话内容不会被存储在服务端。调用 AiService/GetUserPrivacyMode 查询当前状态,调用 AiService/MarkPrivacy 设置隐私偏好。
GetUserPrivacyMode 响应 :
{"inferredPrivacyMode" : "PRIVACY_MODE_NO_STORAGE" }
MarkPrivacy 请求 :
{"currentPrivacyMode" : true ,"onboardingPrivacyMode" : true ,"isUsingCurrentAndOnboardingFormat" : true ,"configuredPrivacyModeForSettings" : true
PRIVACY_MODE_NO_STORAGE 表示当前处于隐私模式,代码不会被存储。inferredPrivacyMode 说明这是服务端根据用户设置推断出来的状态。MarkPrivacy 请求里区分了 currentPrivacyMode(当前会话)和 onboardingPrivacyMode(新用户引导时的设置),说明 Cursor 在不同阶段对隐私的处理可能不同。
结语 Cursor 的通信协议设计得挺精细,但拆开看也没什么黑魔法。
抓包的关键是用 NODE_EXTRA_CA_CERTS 注入自签 CA,Electron 的 Node.js 层不认系统证书。流量是 Connect Protocol,proto 定义藏在客户端 JS 里,protobuf-es 编译后的类保留了 typeName 和 fields,写脚本提取出来就能反序列化。
通信架构是读写分离:RunSSE 长连接负责接收 AI 响应流,BidiAppend 短连接负责发送用户消息。KV 存储让客户端充当缓存层,服务端通过 KvServerMessage 控制上下文的存取。
把这些拼起来,就能完整还原 AI 对话的每个细节。
关于隐私,看完流量之后有些想法。Cursor 提供了 Privacy Mode,开启后 inferredPrivacyMode 会返回 PRIVACY_MODE_NO_STORAGE,官方说代码不会被存储。但实际上,Cursor 的文件索引功能会把你仓库里的每一个文件都同步上传到云端,用于向量搜索。GetServerConfig 里的 indexingConfig 配置了最大 20000 个文件、单文件 100KB 的限制,加密密钥是全局统一的。从 Batch 上报看,即使开了隐私模式,用户行为数据还是会被收集:代码补全的接受或拒绝、diff 操作、tab 切换、plan 创建。StreamCpp 请求也包含光标周围的代码片段。所以 Privacy Mode 更多是”不用你的代码训练模型”,而不是”不上传代码”。用之前最好看清楚官方的隐私政策具体承诺了什么。
下一篇如果还有精力,可能会写 Cursor 的黑盒服务端通道到底在组装什么,哪些字段是客户端生成的,哪些是服务端注入的。
版权声明:本文首发于
白帽酱 的博客,转载请注明出处!